
1- For general usage information of Ar-Gui, please make a detailed examination. (click to see general usage information)
AR GUI
1- For general usage information of Ar-Gui, please make a detailed examination. (click to see general usage information)
To establish a connection between the Ar-GUI program and your robot, click the "Connections" button under "Connection Management" as in Image 1.
Note: Make sure that your robot and the computer on which you will run your Ar-GUI program are on the same internet network. If you are not on the same network, you cannot connect.
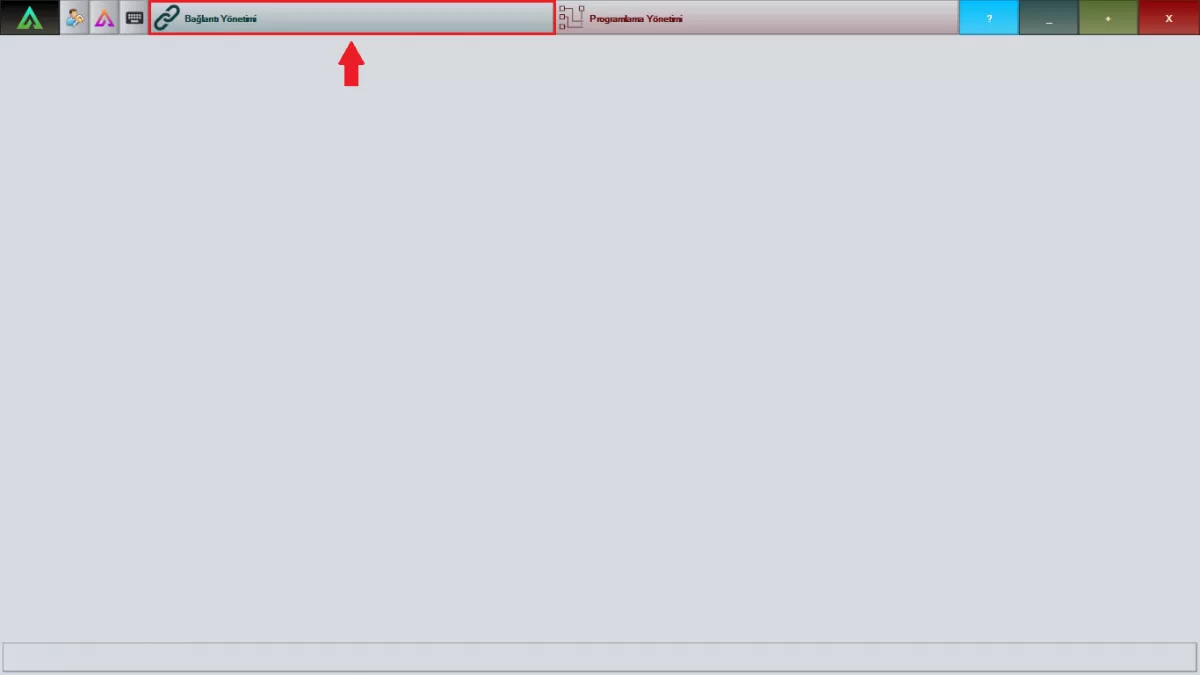 Image 1: Connection Management Screen
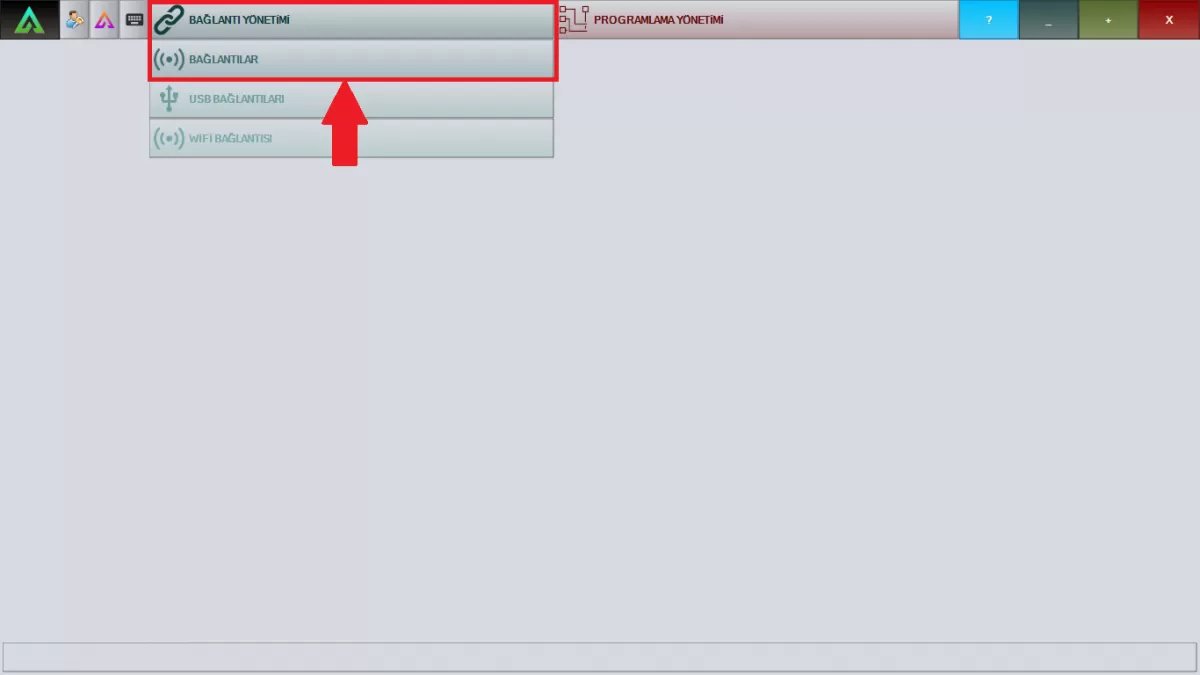 Image 1-1: Connection Management Screen
Select your robot by following the steps in Image 2 from the window opened in Connection Management. Connect by typing the 'Remote Computer Password' on the robot's front screen in the password section.
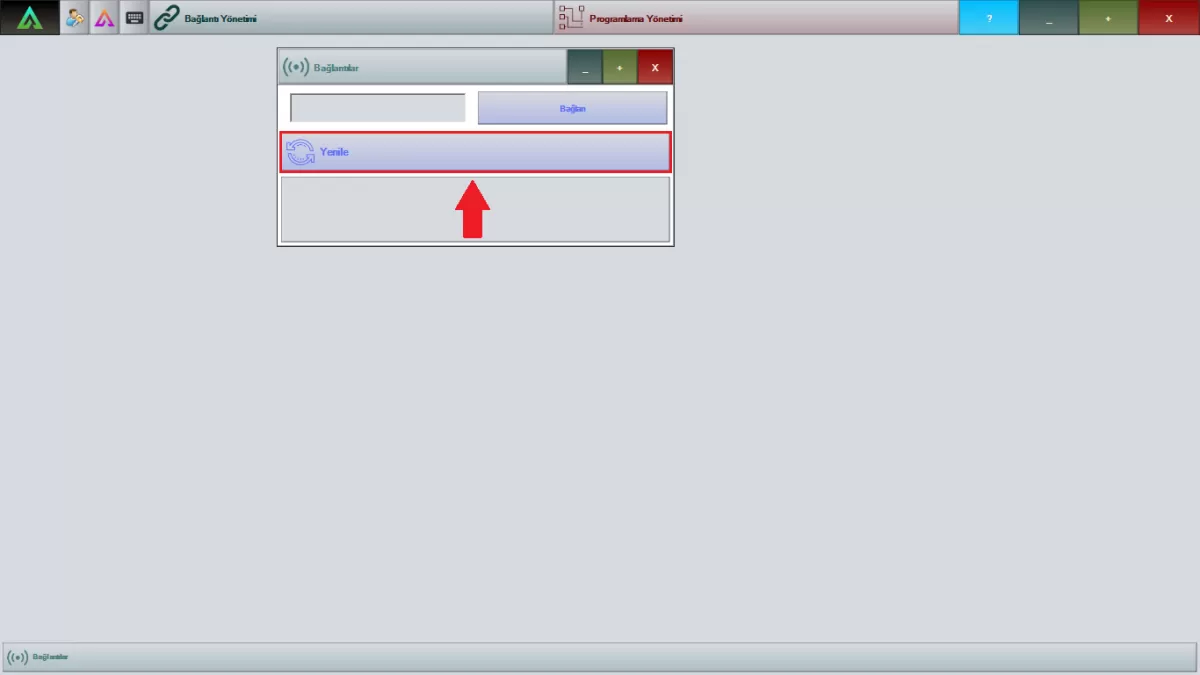 Image 2: Connections Screen
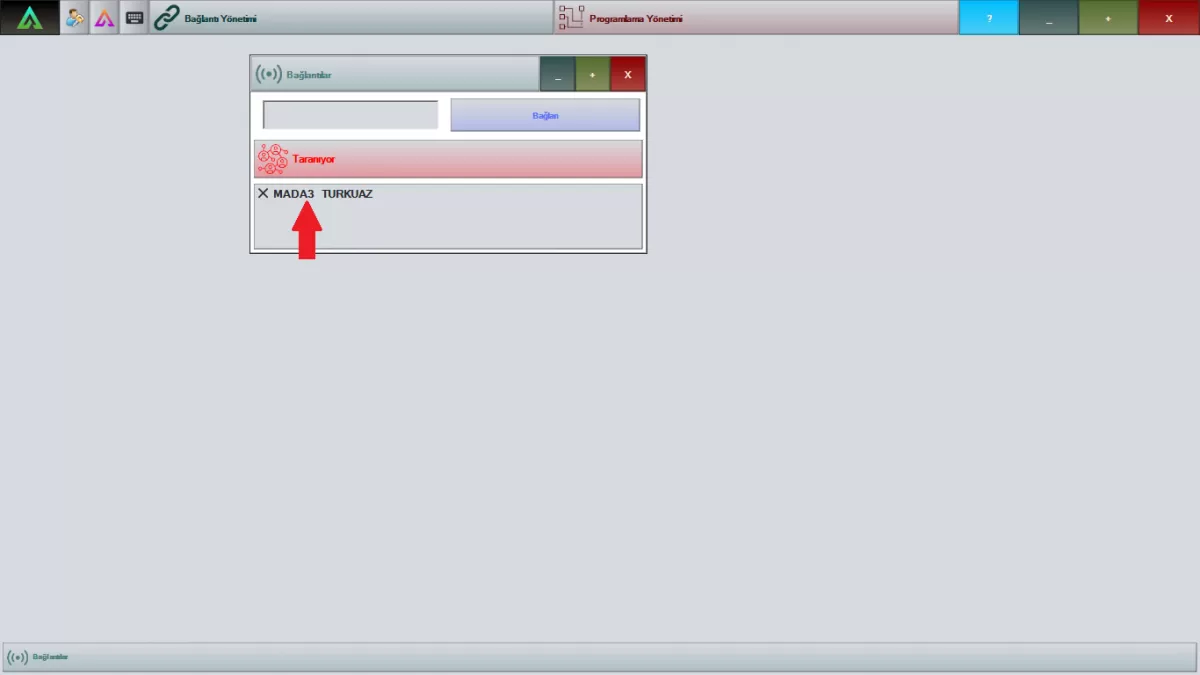 Image 2-1: Connections Screen
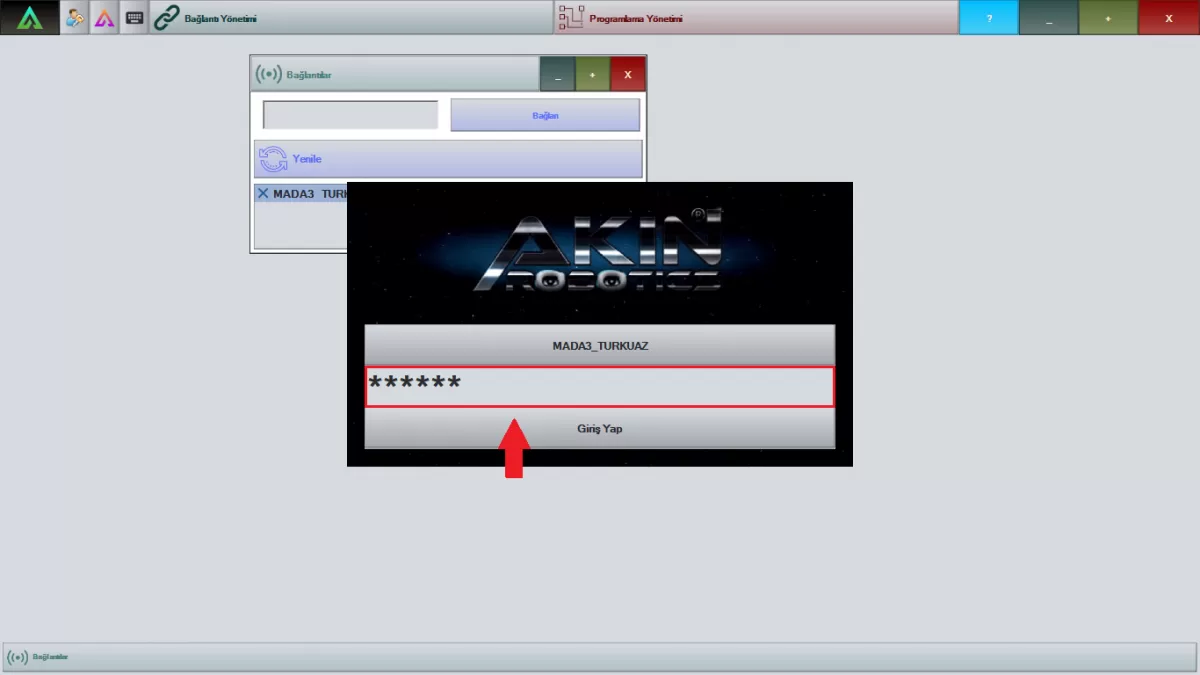 Image 2-2: Connections Screen
After completing your robot connection, open the Programming Management as in Image 3 to start your work.
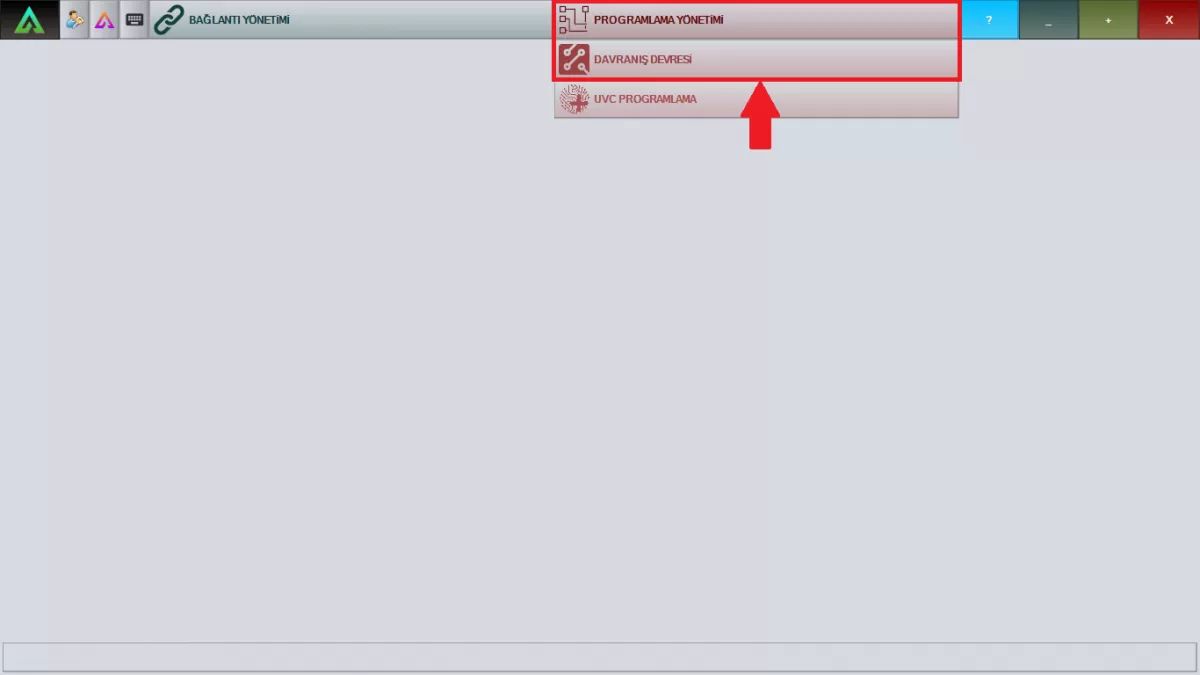 Image 3: Programming Management Screen
Follow the steps in Image 4 by typing the Ar-GUI username and password given to you so that you can log in to your robot as an admin.
Note: You can prepare your choreographies and upload them to your robot without logging in as an admin.
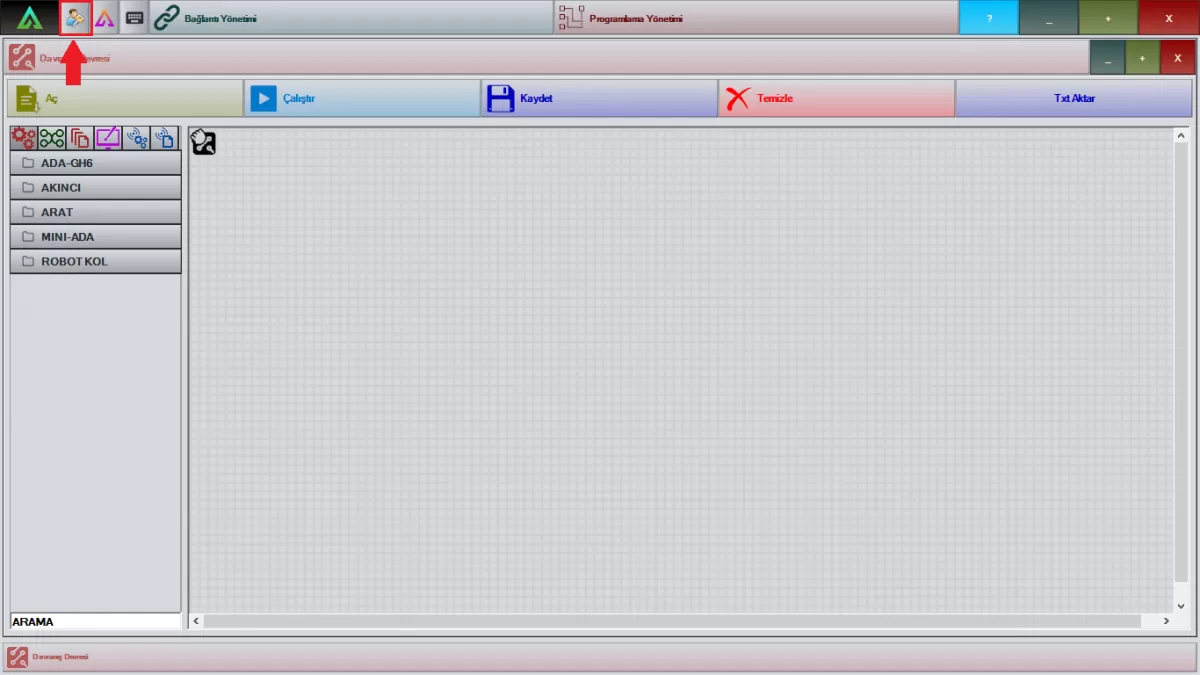 Image 4: Admin Login Screen
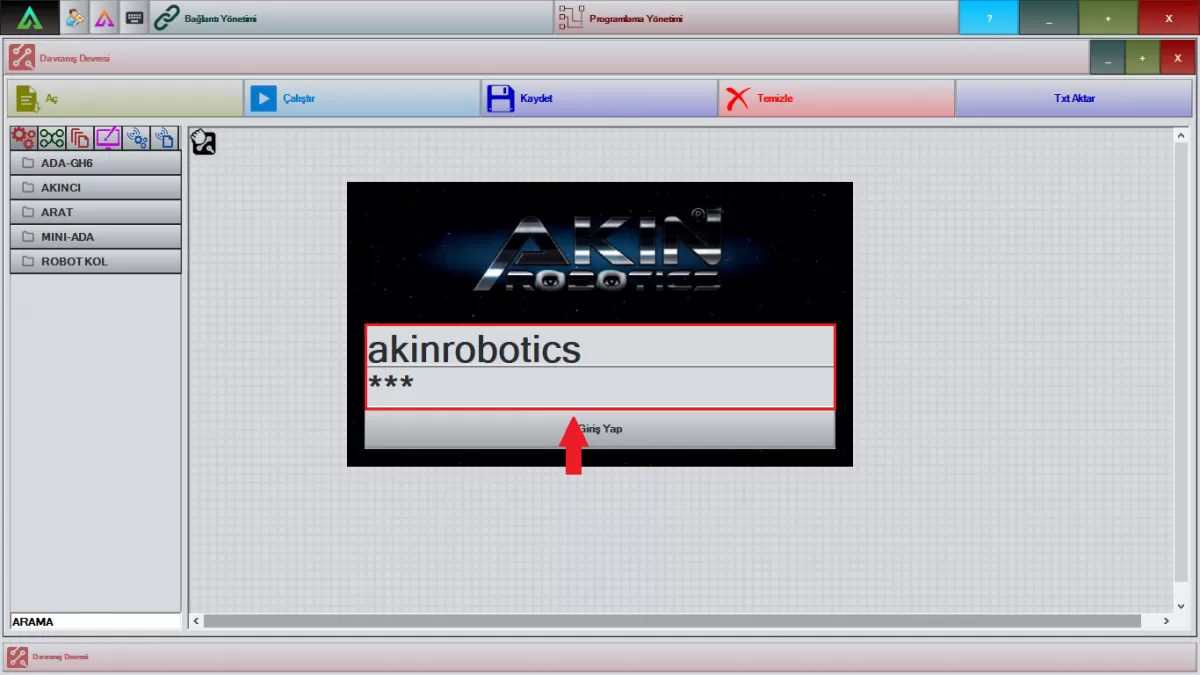 Image 4-1: Admin Login Screen
Connection Management:
You can connect with the robot from the 'Connections' section of the Connection Management system in Image 5.
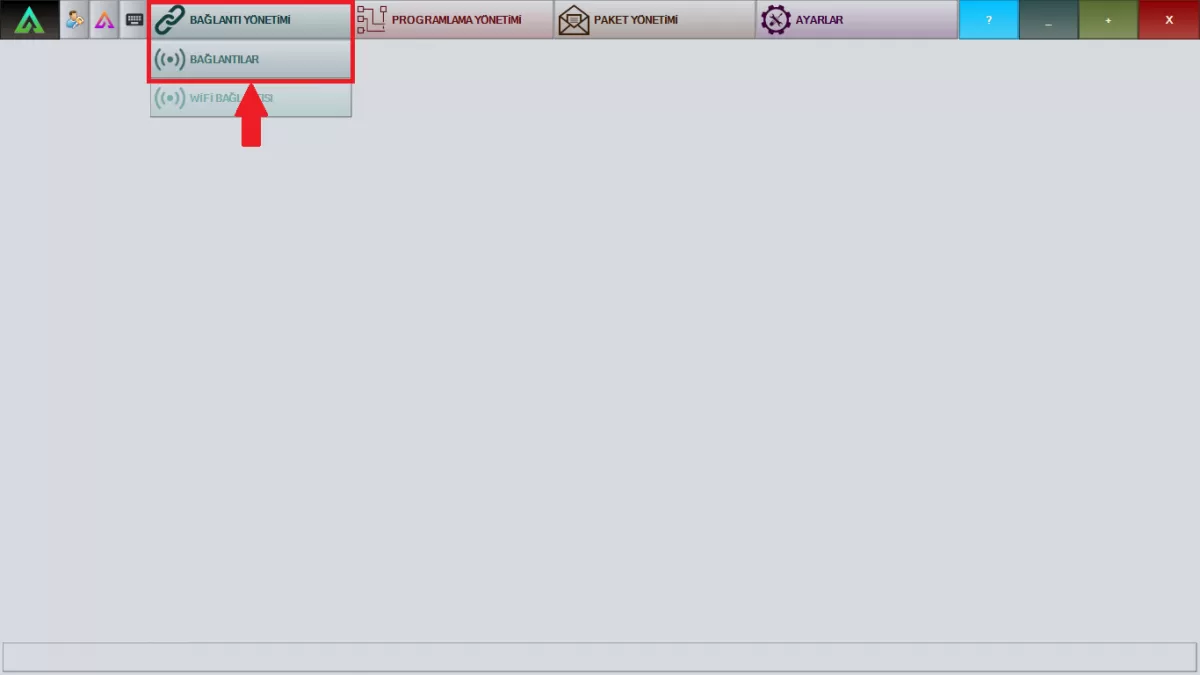
Image 5: Connection Management Screen
Programming Management:
You can open a new working window from the 'Behavior Circuit' section in the Programming Management system in Image 6. The 'Face Registration' section is the section where you will save the picture of the people you want your robot to recognize.
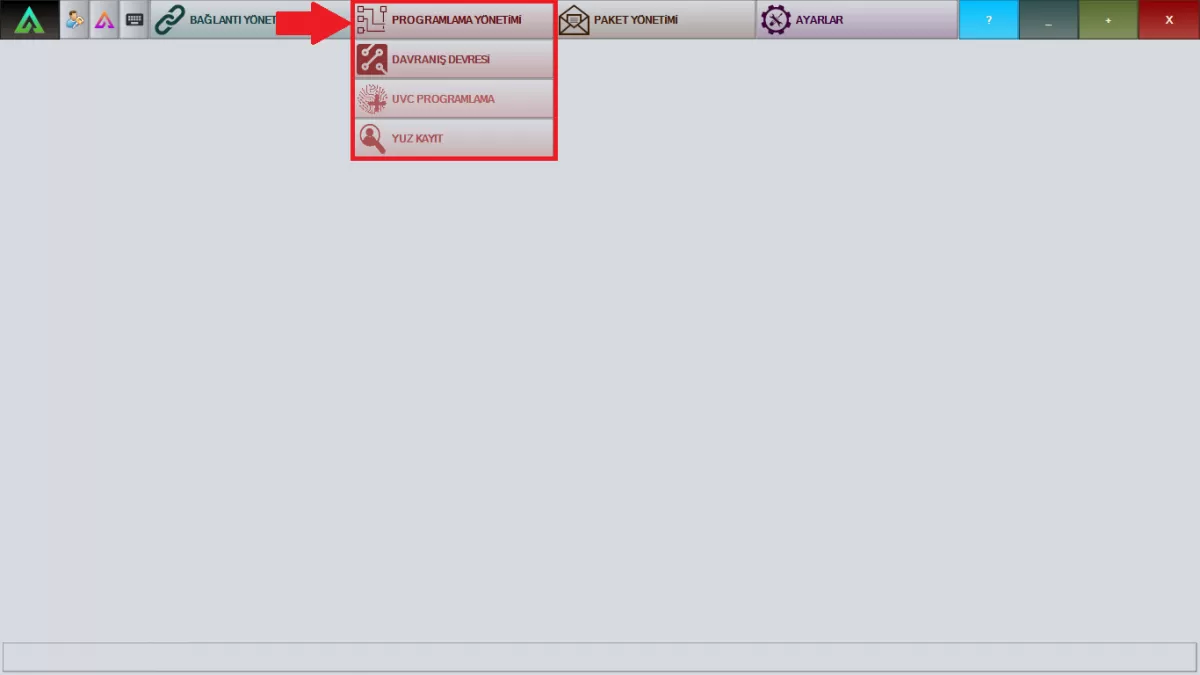 Image 6: Programming Screen Management
Package Management:
In Image 7, you can see the system data of your robot from the 'Incoming' section of the Package Management system. In the 'Outgoing' section, you can see the data you have sent to your robot system. You can see the instant errors in your robot from the 'Errors' section.
Note: Please contact AKINROBOTICS immediately when you get any error.
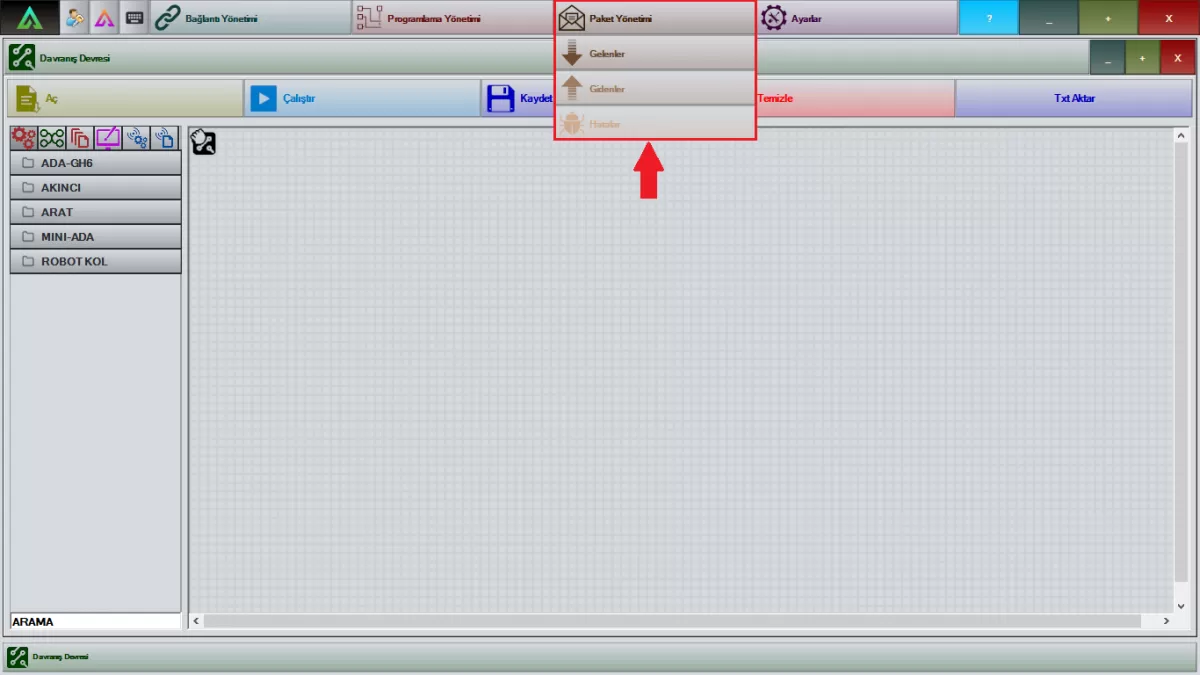 Image 7: Package Management Screen
Settings:
You can see all the software versions in your robot in the 'Versions' section in the Settings menu in Image 8.
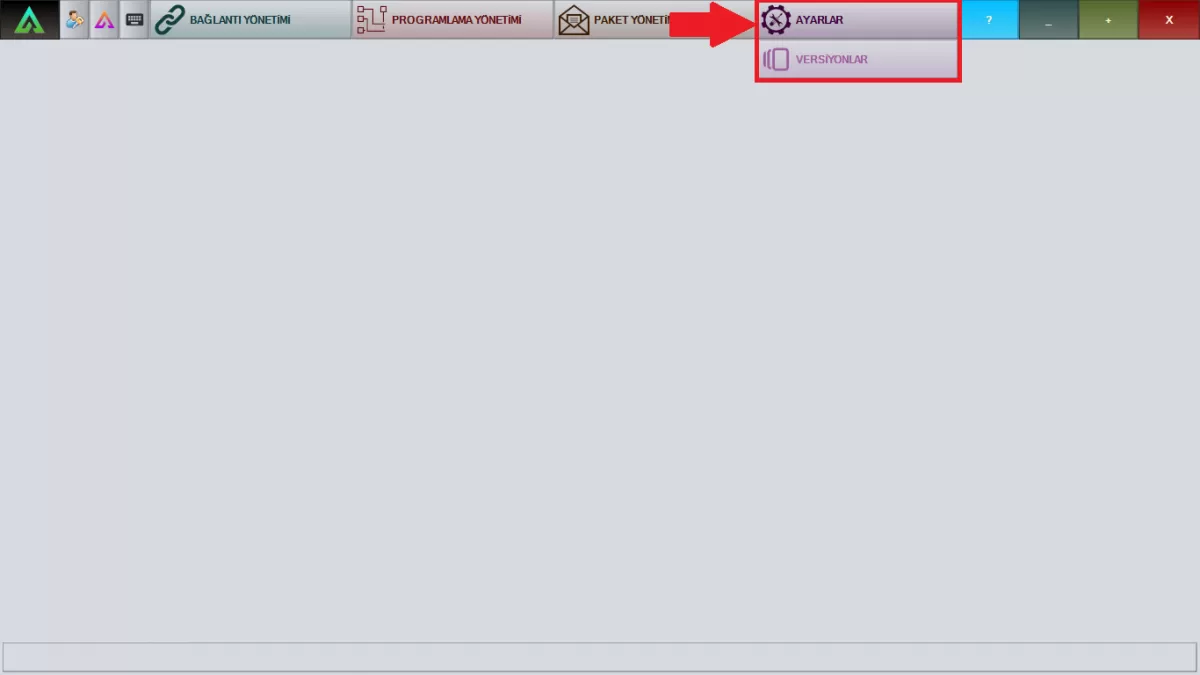 Image 8: Settings Screen
You can open your previously prepared and recorded choreographies in the 'Open' section in Image 9.
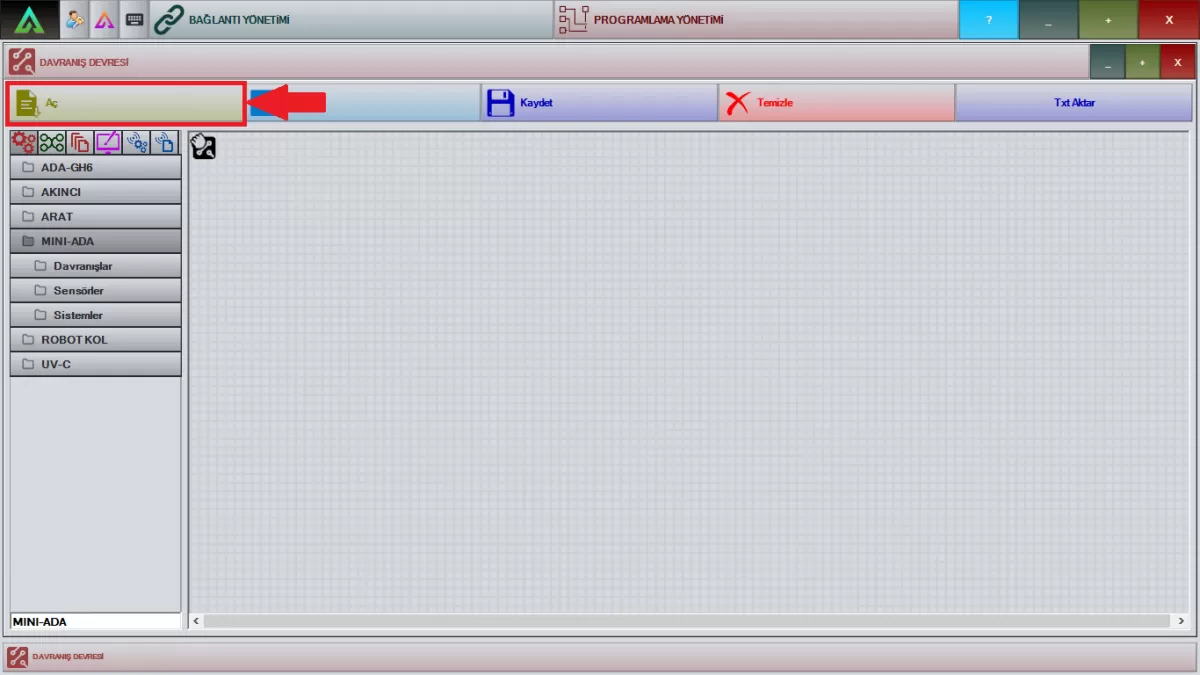 Image 9: Open Saved Choreographies Screen
It is the section that allows you to instantly see the choreographies you have prepared with the 'Run' section in Image 10 on your robot.
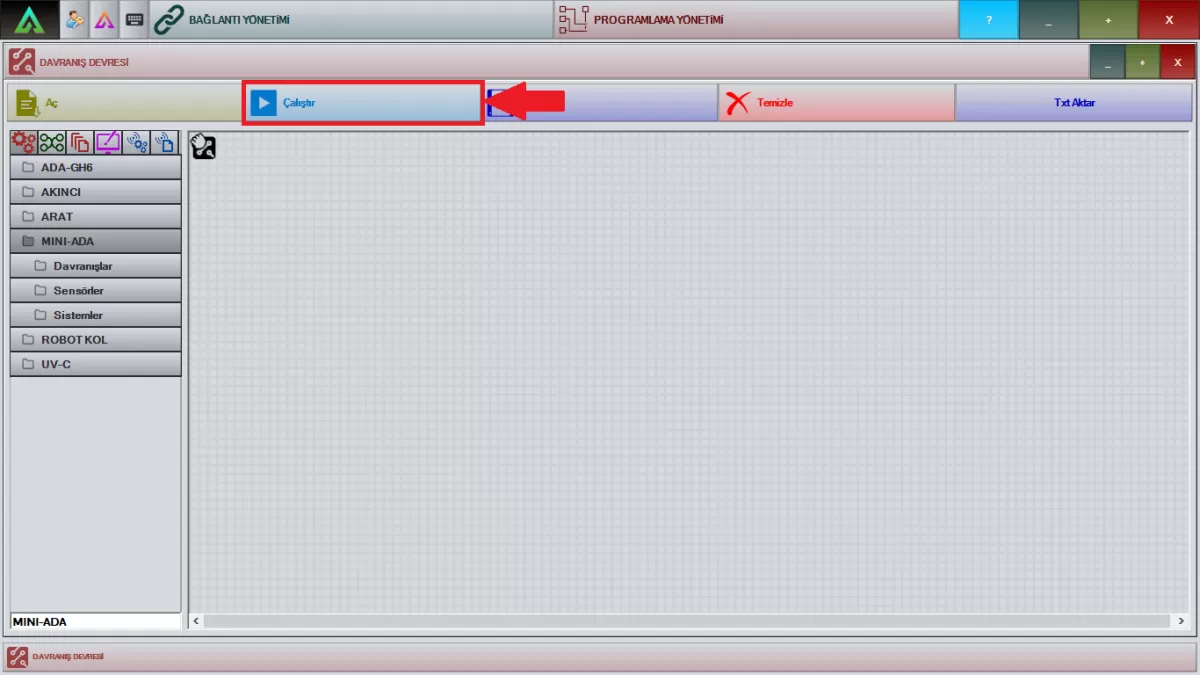 Image 10: Run New Choreographies Screen
With the 'Save' section in Image 11, you can save your newly prepared choreographies.
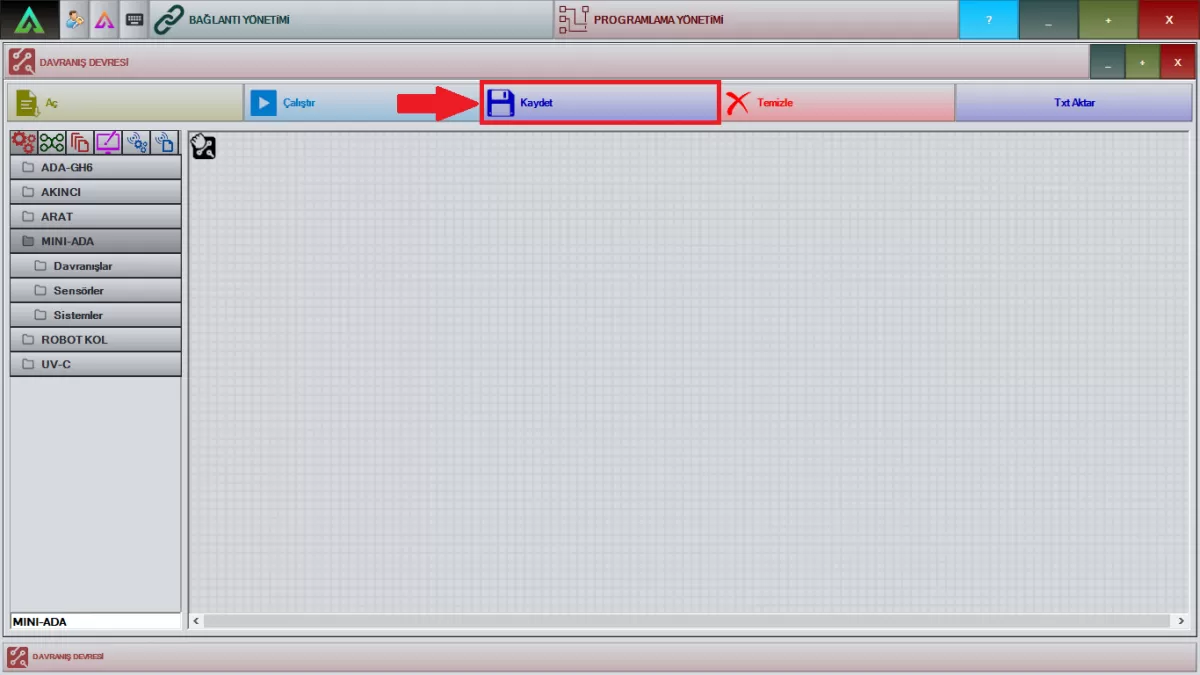 Figure 11: Saving New Choreographies Screen
You can clean your work screen with the 'Clear' section in Image 12.
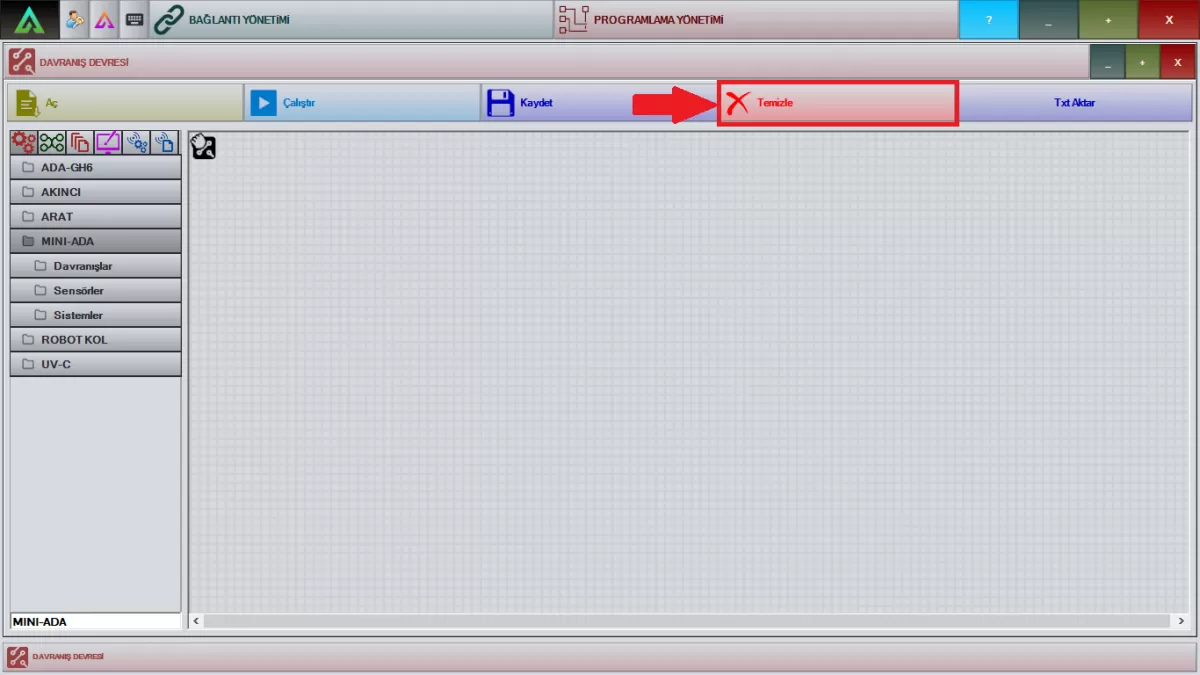 Image 12: Workspace Cleaning Screen
You can receive your works in Txt format with the 'Transfer Txt' section in Image 13.
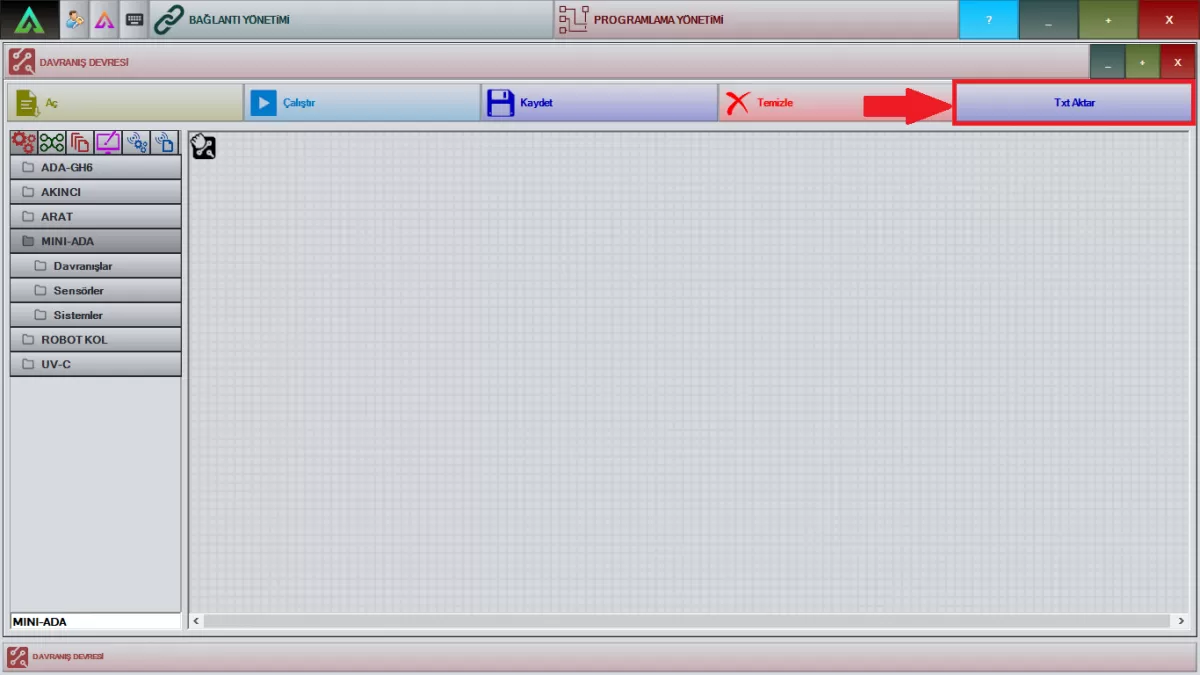 Image 13: Txt Transfer Screen
Mini ADA Daily Use (Components)
Mini ADA Daily Use
Components

Components Screen
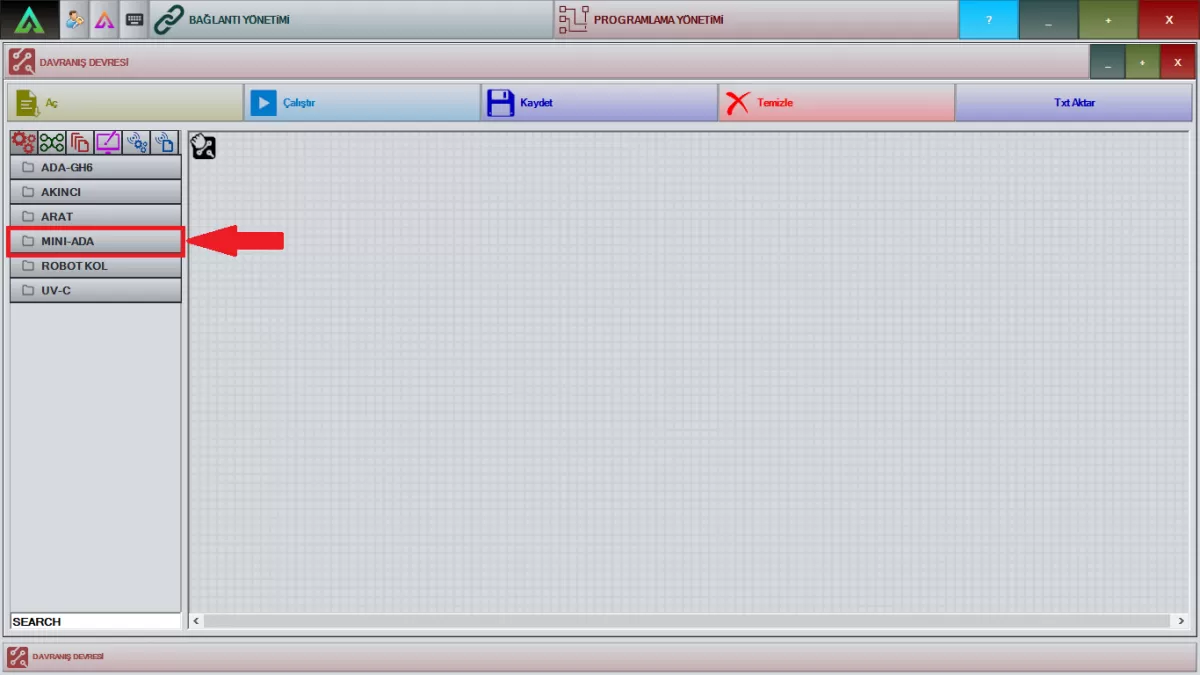
Image 1: Mini ADA Login Screen
1-Behaviors
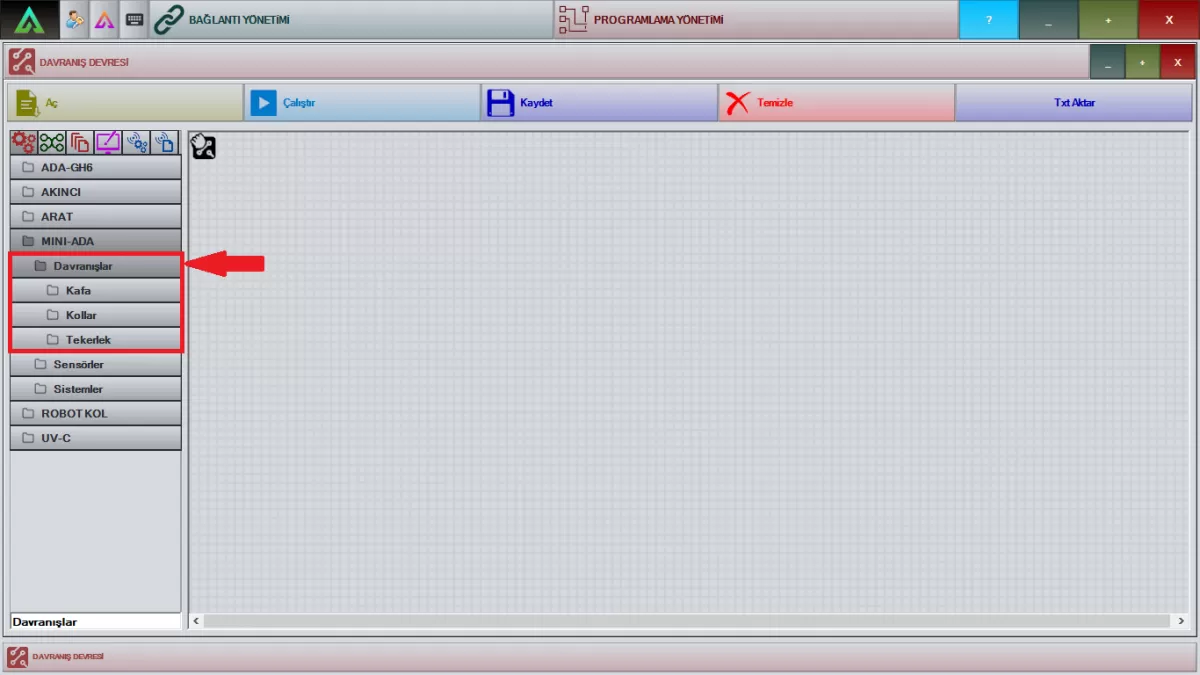
Image 2: Behaviors Screen
A) Head
You can use any of the packages shown in Image 3 in your choreographies by dragging them to the working screen. You can use these packages ready-made, or you can right-click and change their angles, speed and torque according to your own choreographies.
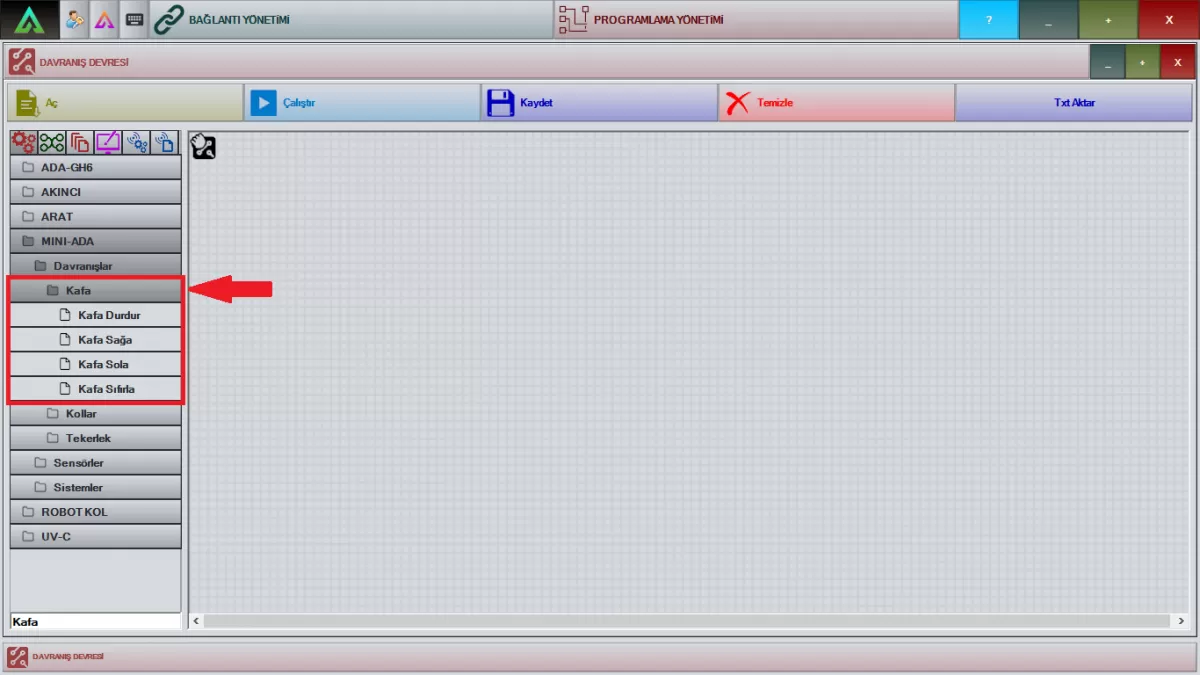
Image 3: Head Joints Screen
B- Arms
The packages shown in Image 4 are right and left arm joint packages. You can use it in your choreographies by dragging it to your work screen. You can use these packages ready-made, or you can right-click and change their angles and speed according to your own choreographies.
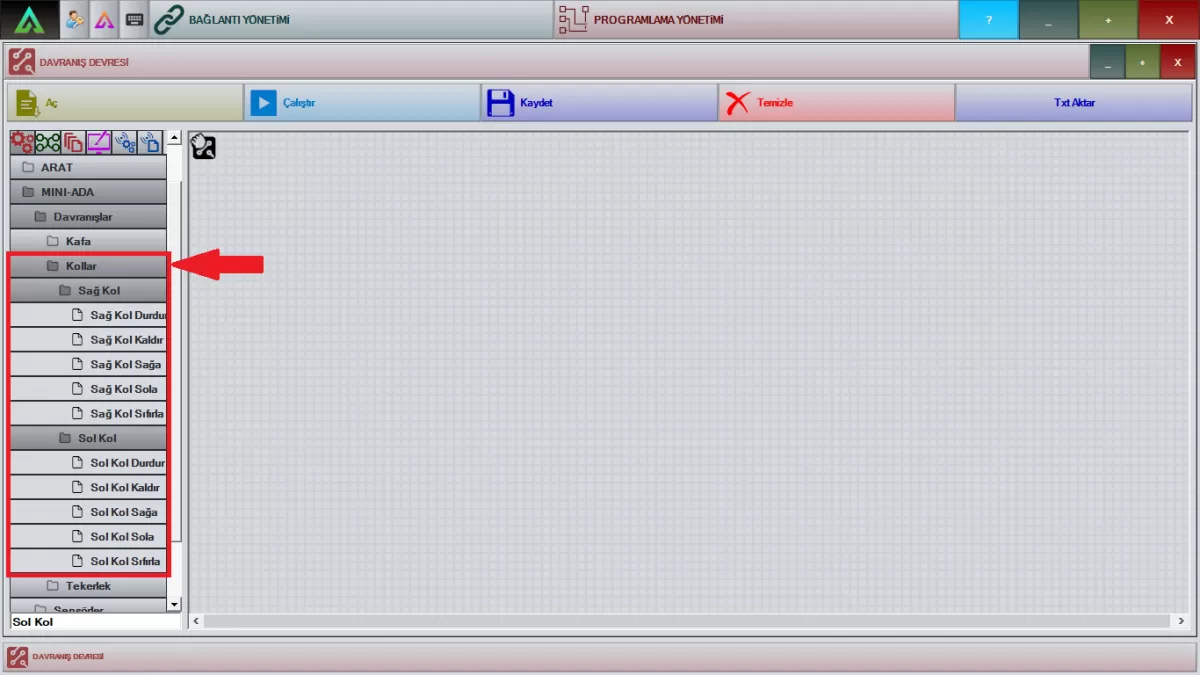 Image 4: Right and Left Arm Joints Screen
C- Wheel
The packages shown in Image 5 are wheel system packages. You can use it in your choreographies by dragging it to your work screen. You can use these packages ready-made, or you can right-click and change the angle, speed, and distance according to your own choreographies.
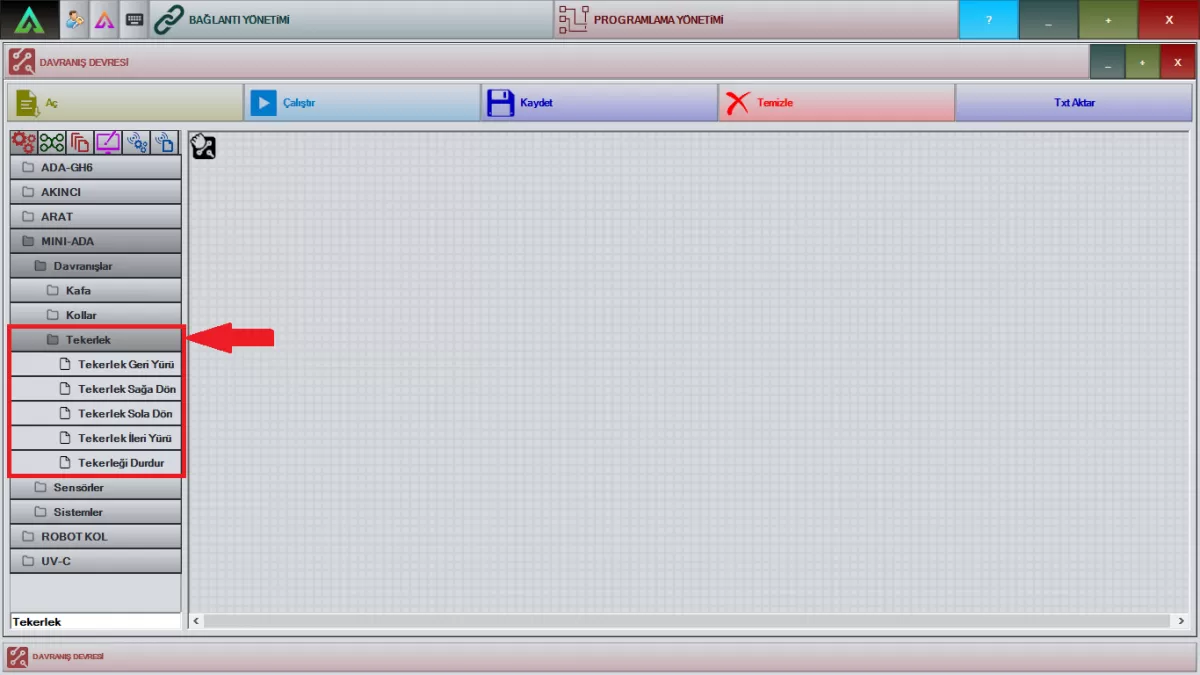
Image 5: Wheel System Screen
2-Sensors
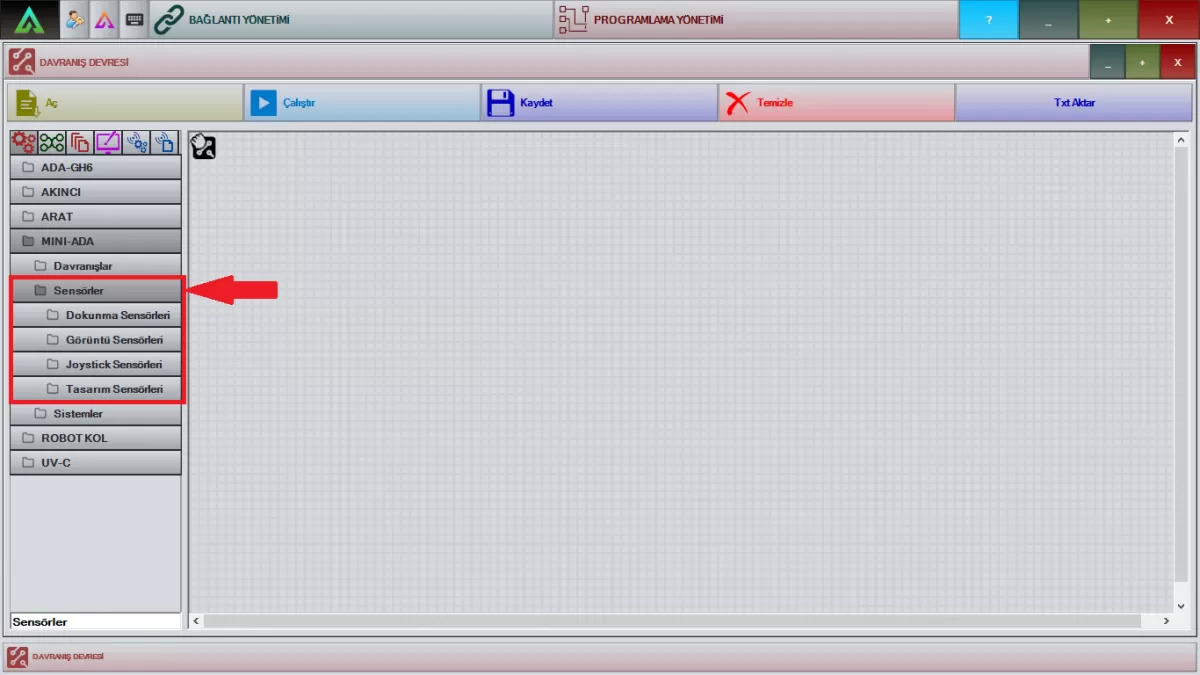
Sensors Screen
A-) Touch Sensors
Drag the package shown in Image 2 to the working screen and right-click. This study package is given to you ready-made. When the love sensor on the head of your robot is touched, it will react with the sentences in the choreography you have prepared.
Note: This feature is not available on all MiniADAs. It is optionally integrated.
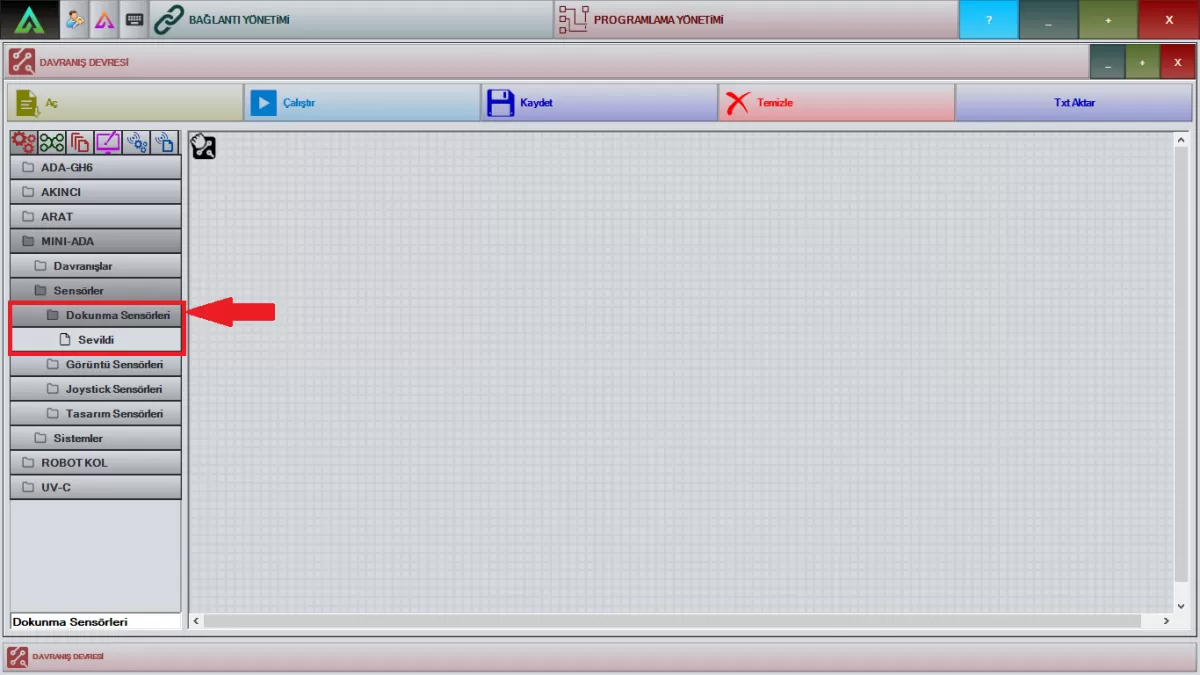
Image 2: Touch Sensors Screen
B-Image Sensors
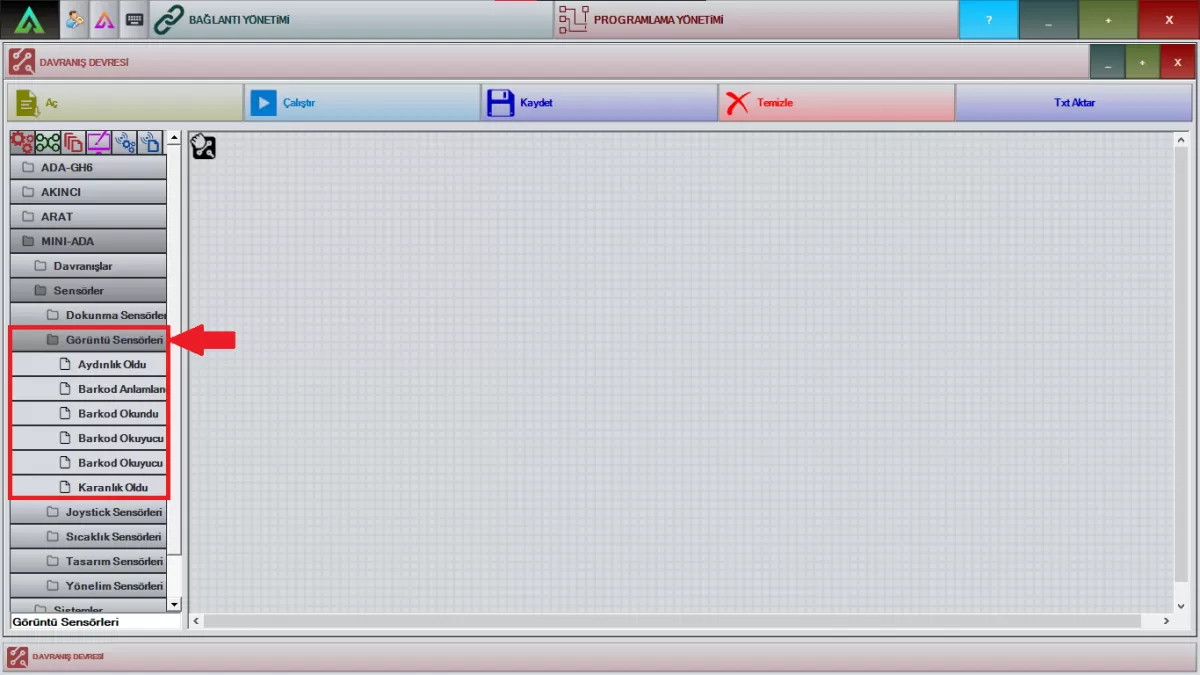
Image 3: Image Sensors Screen
It's Bright: Drag the relevant package to the work screen. According to the choreography you have prepared, when your robot enters a brighter environment from a dark environment, it will detect the environment and warn you thanks to the camera on it.
Barcode Interpretation: Drag the relevant package to the work screen and right-click. With the package shown in the window that opens, you can make transactions with a QR code. You can use the barcode reader feature by saving the information of your QR studies in the barcode interpretation window.
Note: This feature is not available on all MiniADAs. It is optionally integrated.
Barcode Read: Drag the relevant package to the work screen. With the pop-up window, the QR code held in front of the barcode reader enables the previously interpreted information to be read and to act according to the information read.
Note: This feature is not available on all MiniADAs. It is optionally integrated.
Open Barcode Scanner: Drag the relevant package to the workspace. The package shown in the window that opens starts the barcode reader system.
Note: This feature is not available on all MiniADAs. It is optionally integrated.
Barcode Scanner Close: Drag the relevant package to the work screen. The package shown in the opened window turns off the barcode reader system.
Note: This feature is not available on all MiniADAs. It is optionally integrated.
It's Dark: Drag the relevant package to the working screen. According to the choreography you have prepared, when your robot enters a darker environment from a bright environment, it will detect the environment and warn you, thanks to the camera on it.
C-) Joystick Sensors
Drag any of the packages shown in Image 4 to the screen. With the packages shown in the opened windows, you can assign the keys to your Joystick. Determine what operations will be performed on these keys with the choreography you will prep
Among the packages shown in Image 4,the default mode in the Joystick Mode Change section is the package in which you will activate the commands given to your robot. With Autonomous Mode, you can assign the keys on the joystick from your choreographies or the joint movements of the MINI ADA. are.
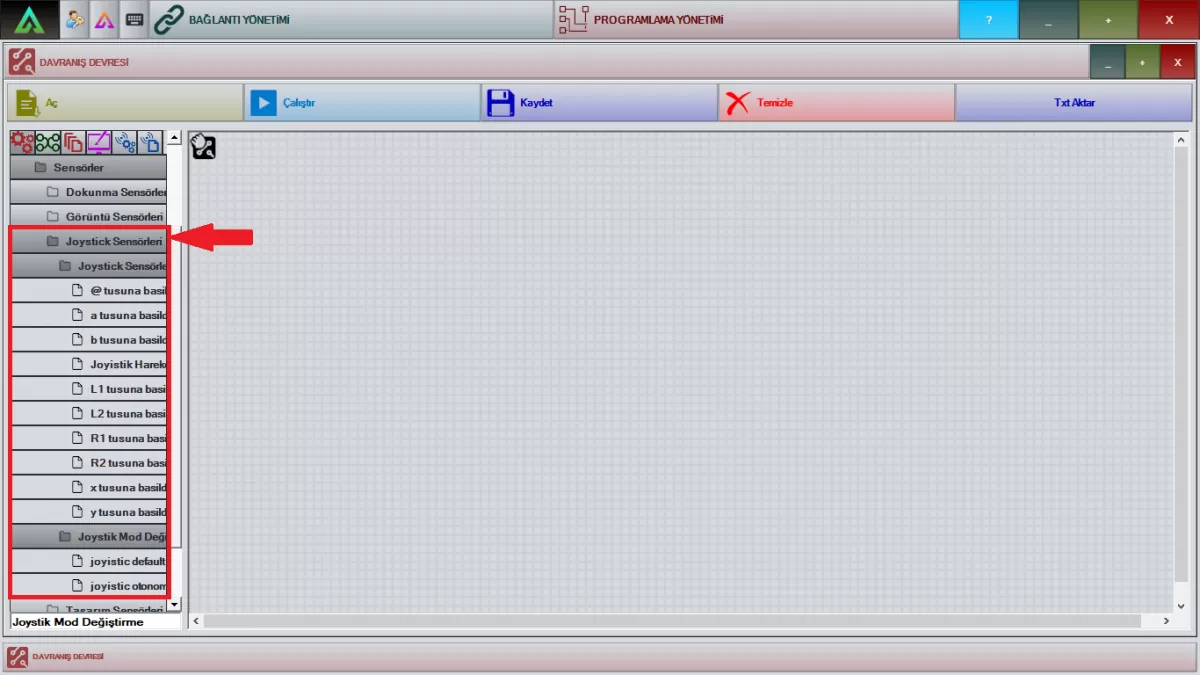
Image 4: Joystick Sensors Screen
D-) Temperature Sensors
You can get information about the ambient temperature with the package shown in Image 5. By using the 'variable assignment' package in the commands tab in the programming section, you can have it give information about the increase or decrease in the ambient temperature you have determined with the choreography you will create.
Note: This package can only be activated on robots with a temperature sensor.
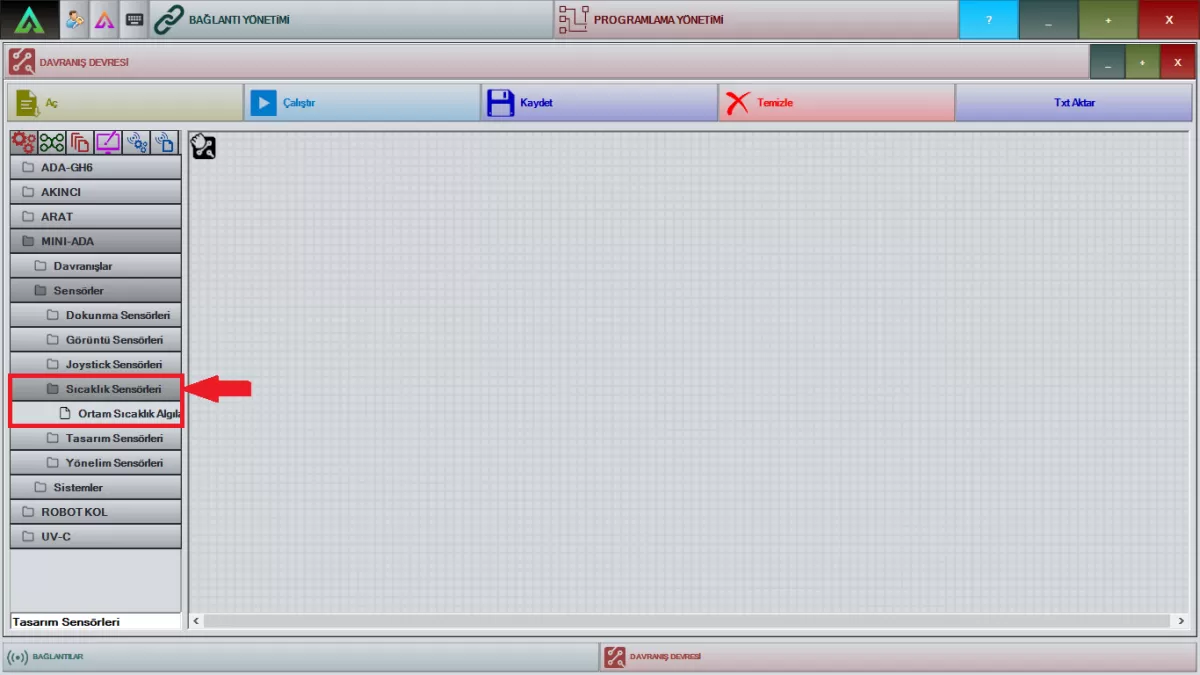 Image 5: Temperature Sensors Screen
E-) Design Sensors
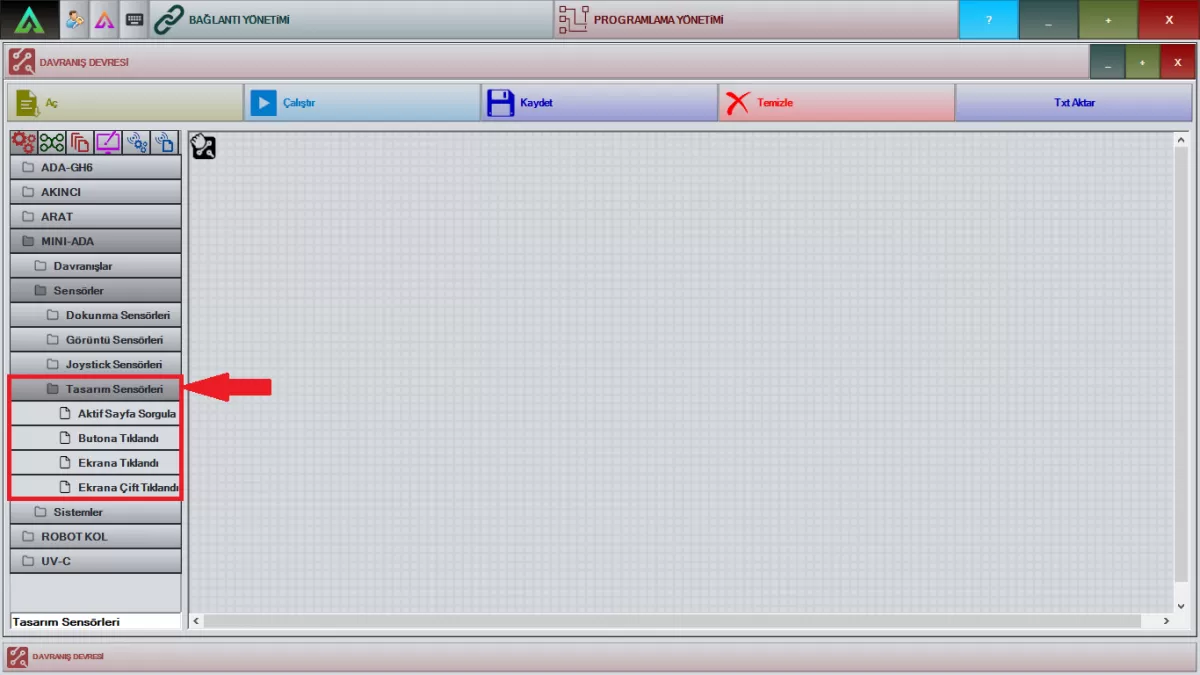 Image 6: Design Sensors Screen
Query Active Page: It is the package that informs the front screen of MiniADA on which page your designs you have prepared with Ar-Designer are on.
Button Clicked: It is the package that activates the actions you want your robot to perform when any button is clicked in the choreographies you have prepared with Ar-Designer on the front screen of Mini ADA.
Clicked on the Screen: It is the package that activates the actions you want your robot to perform when clicking anywhere on the screen in the choreographies you have prepared with Ar-Designer on the front screen of Mini ADA.
Double-Clicked on the Screen: It is the package that activates the actions you want your robot to perform when you click on any part of the screen more than once in your choreographies that you have prepared with Ar-Designer on the front screen of Mini ADA.
F-) Orientation Sensors
The packages shown in Image 7 enable the use of ultrasonic sensors integrated into the robot. You can adjust the distance of each of these sensors individually with your choreography. You can set the distance of all sensors equally with the value you write in the 'Distance Detected' package. The values you will write on these packages are measured in centimeters (cm).
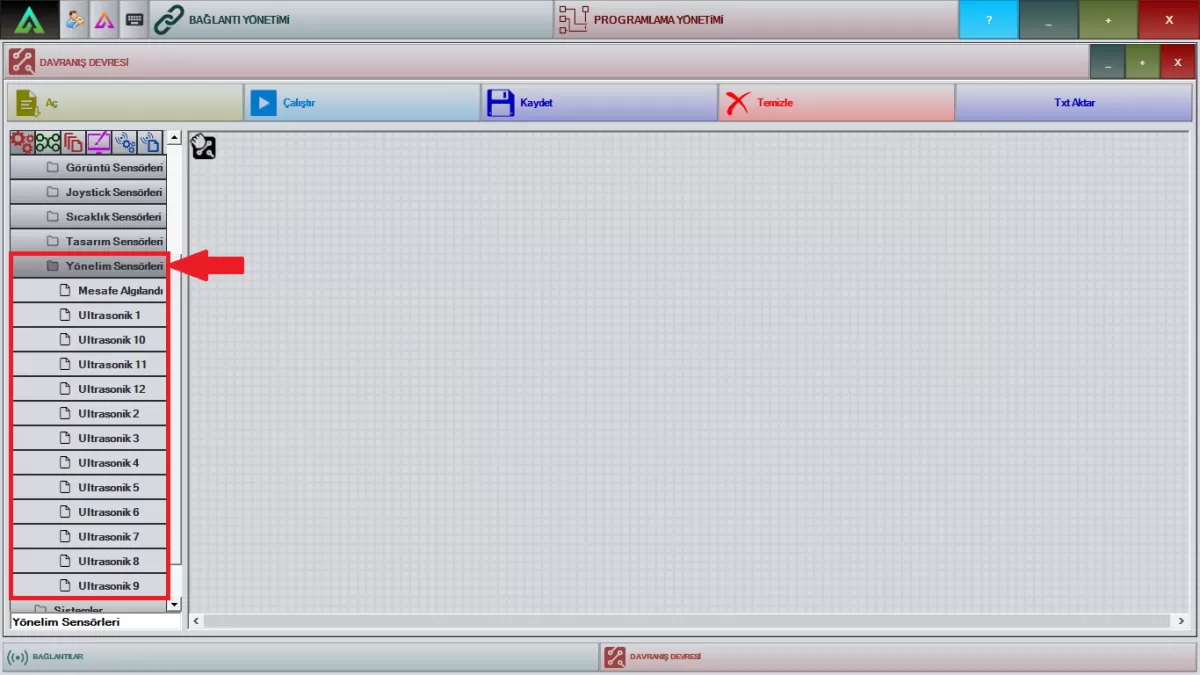 Image 7: Orientation Sensors Screen
3-Systems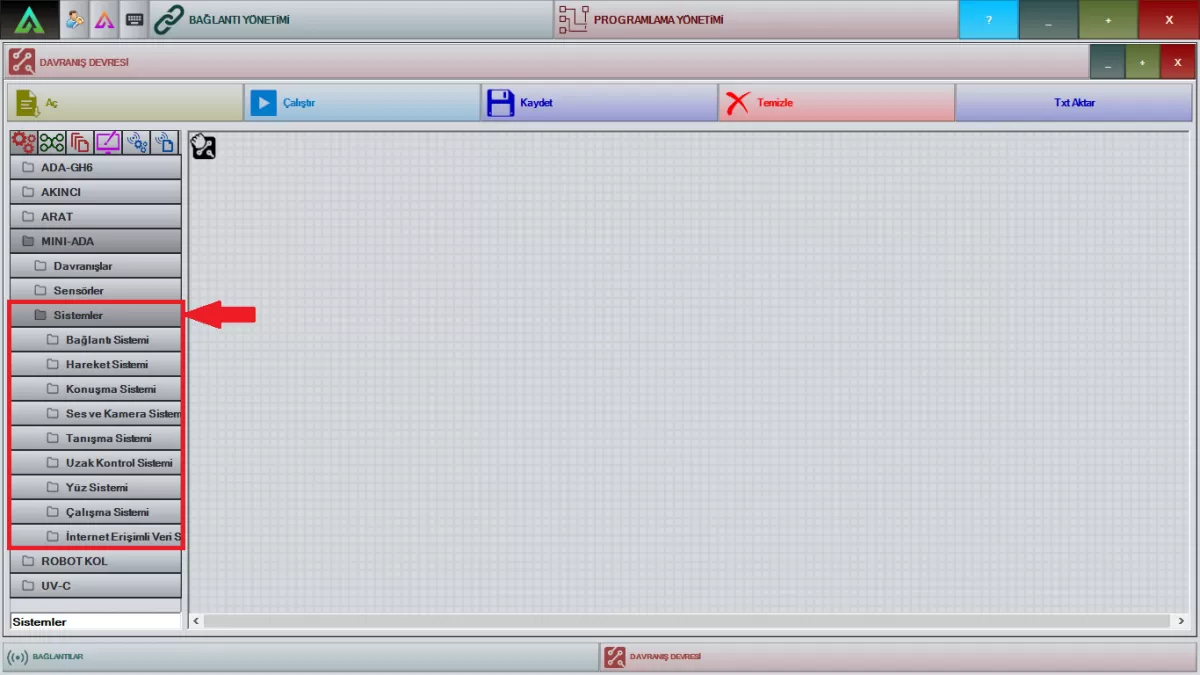 Image 1: Systems
A- Connection System
 Image 1: Connection System Screen
Robot USB Breakout Time: If you experience a break in your USB in the robot's internal mechanism, you can detect your USB breakouts with this package. E.g; If you connect the robot restart package after this package, your robot will automatically restart itself in case of USB disconnections.
Internet Control: Drag the relevant package to the work screen. It is the package that you should use at the beginning of all the works that your robot will do depending on the internet network.
Internet Available: Drag the relevant package to the work screen. Your robot will do all the operations with this package knowing that it has internet. Depending on this, you can have internet-enabled notifications for your choreographies.
No Internet: Drag the relevant package to the work screen. With this package, you can give them information that your robot does not have internet access to with the choreography you will prepare.
B- Movement System
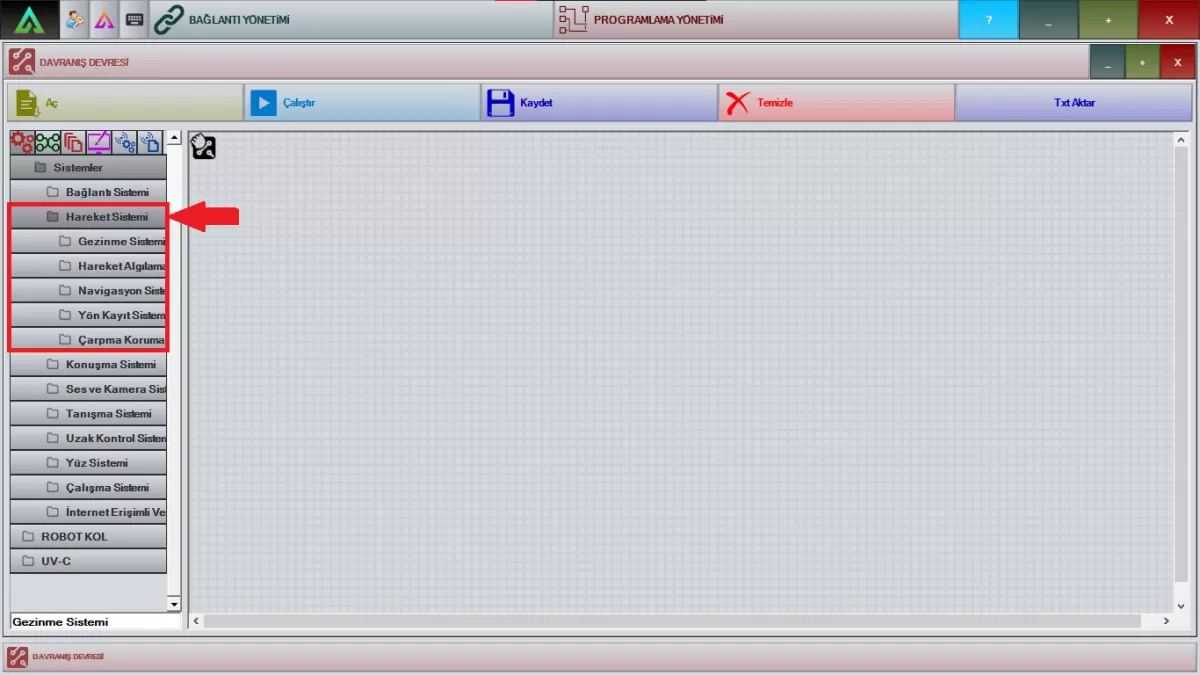 Image 2: Movement System Screen
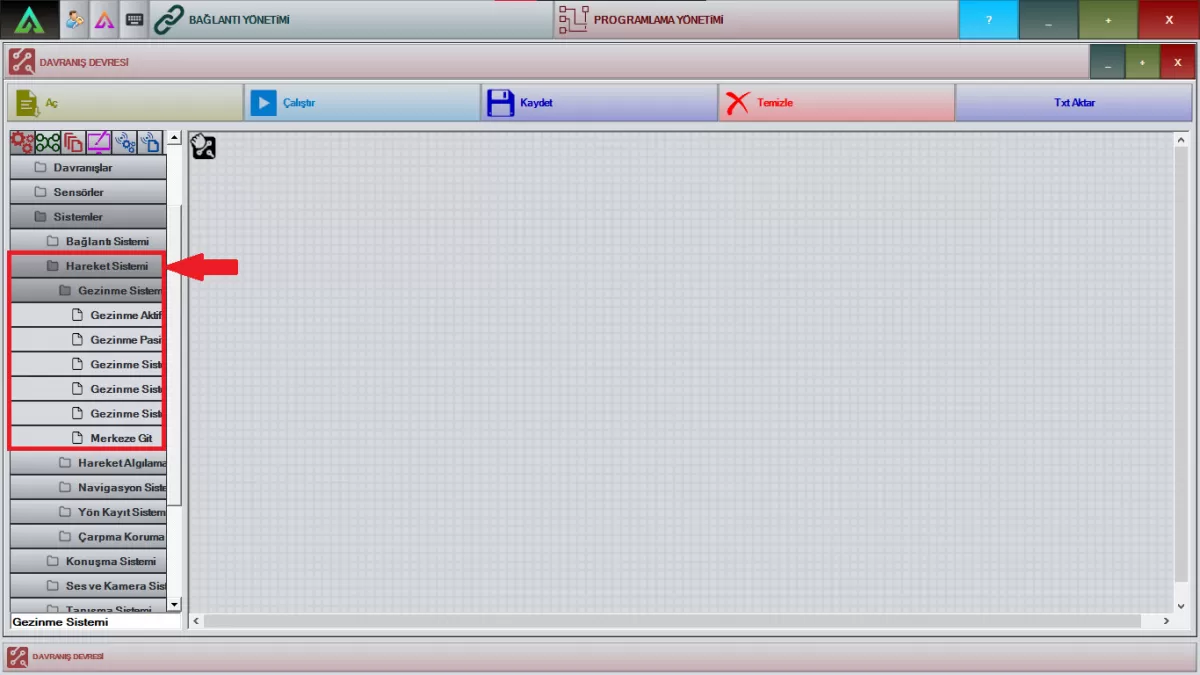 Image 3: Navigation System Screen
Navigation Active: Drag the relevant package to the workspace. You can run the choreography you have prepared for the navigation system by making a connection right after the active package of the navigation system. With the activation of this package, your robot will provide its own navigation.
Note: If your robot has a beacon navigation system, you can use this package.
Navigation Passive: Drag the relevant package to the workspace. You can stop the choreography that you have prepared and activated about the navigation system by connecting with the passive package of the navigation system. Your robot whose navigation system is disabled will not do any scanning.
Note: If your robot has a beacon navigation system, you can use this package.
Navigation Open System: Drag the relevant package to the workspace. It is the package that starts your robot's self-navigation system. You can activate the choreography you have prepared after this package.
Note: If your robot has a beacon navigation system, you can use this package.
Navigation System Hold: Drag the relevant package to the workspace. It is the package that keeps your robot's self-navigation system turned on. Depending on the choreography you will prepare, you can keep the navigation system on hold for a period of time or indefinitely with this package.
Note: If your robot has a beacon navigation system, you can use this package.
Navigation System Close: Drag the relevant package to the workspace. It is the package that closes the self-navigation system of your robot that is turned on. You turn off the navigation system with this package according to the choreography you will prepare.
Note: If your robot has a beacon navigation system, you can use this package.
Go to Center: Drag the relevant package to the workspace. It is a package that allows your robot to determine a center with the choreography you will determine outside of working hours and wait there.
Note: If your robot has a beacon navigation system, you can use this package.
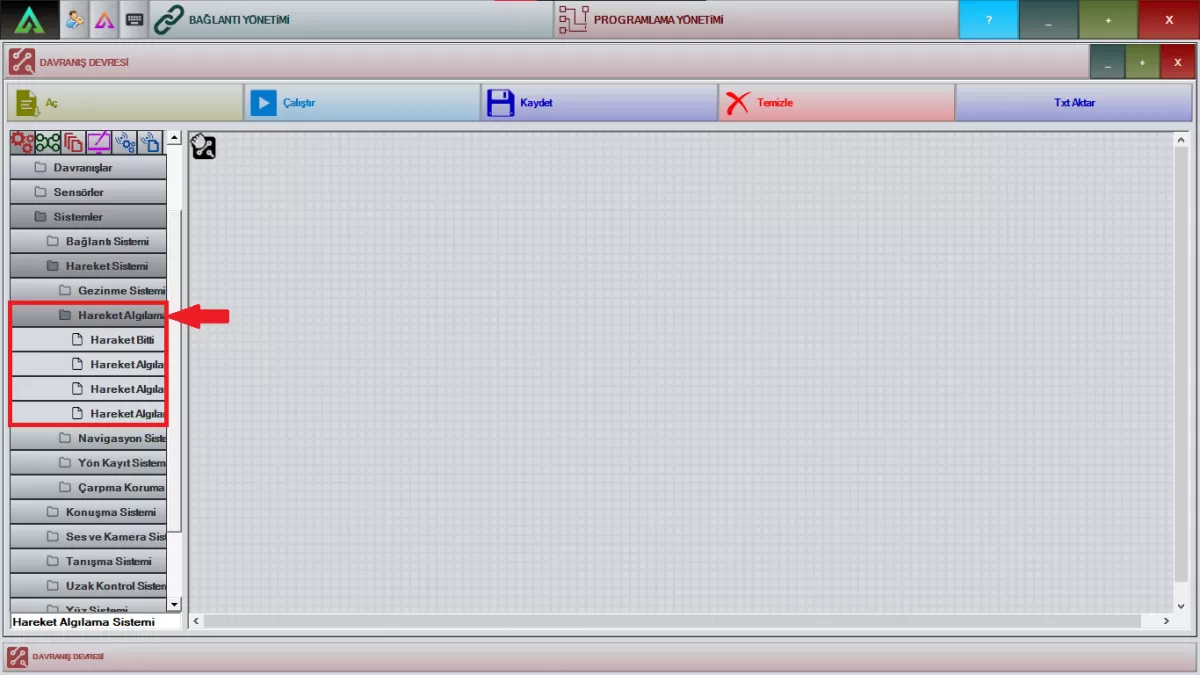 Image 4: Motion Detection System Screen
Movement Done: Drag the relevant package to the work screen. When your robot cannot detect any movement, you can have it warn you according to the choreography you have prepared.
Start Motion Detection: drag the relevant package to the working screen. It is the package where you will activate motion detected and motion over systems. When preparing your choreographies, you must use them before the related packages.
Stop Motion Detection: drag the relevant package to the working screen. It is the package where you will stop motion detected and motion finished systems.
Motion Detected: drag the relevant package to the workspace. With this package, you can detect everything moving in front of the robot via the camera located on the head of the robot and have the robot warn you.
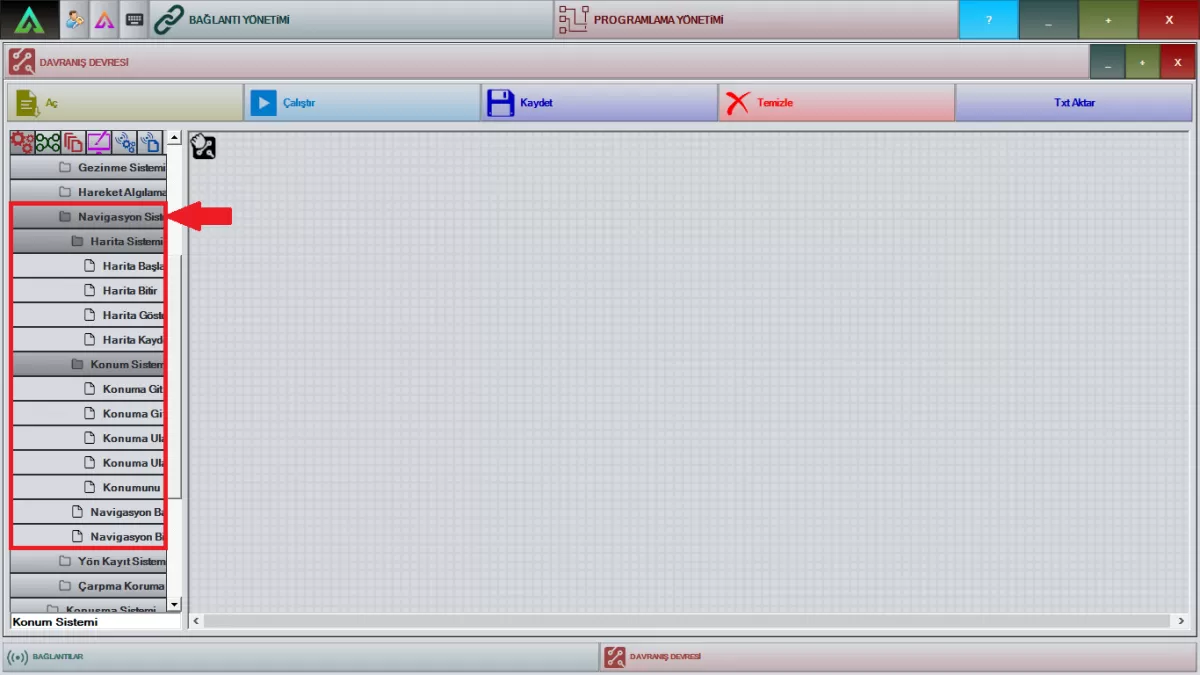 Image 5: Navigation System Screen
Start Map: Drag the relevant package to the workspace. It is a package to be used in Mini ADA with Indoor Mapping (Autonomous Navigation) feature. Before introducing the Autonomous Navigation area, you can start the mapping process by clicking the 'Publish' button in this package.
Note: Not available on Mini ADAs without Indoor Mapping.
Finish Map: Drag the relevant package to the work screen. In Mini ADA, which has Indoor Mapping (Autonomous Roaming), the mapping process is completed by clicking the 'Publish' button in this package after the area to be autonomously navigated is defined and recorded.
Note: Not available on Mini ADAs without Indoor Mapping.
Show Map: Drag the relevant package to the working screen. You can view the map that you have saved in Mini ADA by specifying its areas, by clicking the 'Publish' button in this package.
Save Map: Drag the relevant package to the workspace. Move the Mini ADA in the area you have determined with the help of the joystick. By clicking the 'Publish' button in this package, you can save the map you have created in the area you specify.
Go to Location: Drag the relevant package to the workspace. You can go to any location you have saved on the map inside Mini ADA with this package. Make sure that the name of the location you have saved in the map goes into the package by writing it.
Stop Going to Location: Drag the relevant package to the workspace. It is the package that is used to stop while moving to a location on the map inside the Mini ADA. You can stop your robot whenever you want with the help of this package, as you have determined in your choreographies.
Failed to Reach Location: Drag the relevant package to the workspace. It is the package that will warn you when you are going to a location on the map you have saved in Mini ADA or when it cannot find the location to go while preparing to go. When your robot can't find a location, you can give a warning with your choreographies.
Reached Position: Drag the relevant package to the working screen. It is a package that informs you that you have reached a location on the map you have saved in Mini ADA. When your robot reaches a position, you can give a warning with your choreographies.
Find Location: Drag the relevant package to the workspace. Click the 'Publish' button in this package so that it knows where it is on the map you have saved in Mini ADA. In this way, it calculates the distance to go by knowing its location.
Start Navigation: Drag the relevant package to the workspace. It is the package that you need to activate before you start the process of going to the locations on the map that you have saved in Mini ADA. You can activate this package by clicking the 'Publish' button on it.
End Navigation: Drag the relevant package to the workspace. It is the package that stops the process of going to the locations on the map that you have saved in Mini ADA. You can activate this package by clicking the 'Publish' button on it.
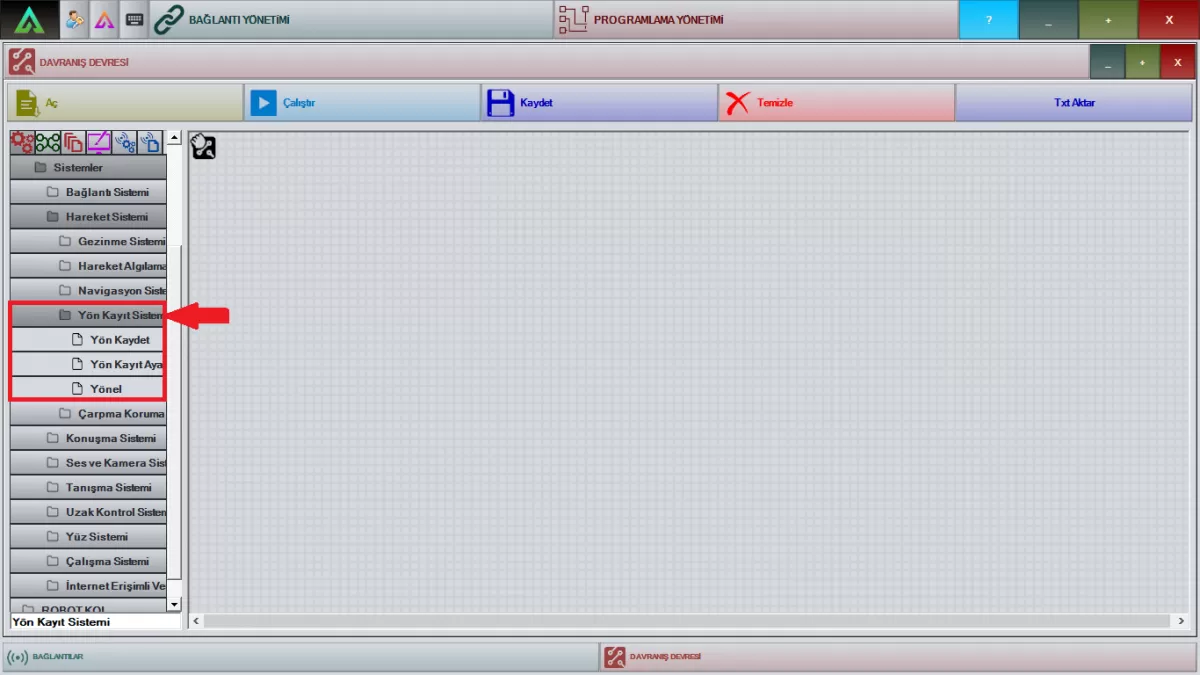 Figure 6: Direction Recording System Screen
Save Direction: This is the package you need to use so that your robot can turn in the specified direction.
Note: If your robot has a beacon navigation system, you can use this package.
Direction Registration Settings: It is the system adjustment package used before using the direction packages.
Note: If your robot has a beacon navigation system, you can use this package.
Direction: It is the package that allows your robot to steer to the direction you specify.
Note: If your robot has a beacon navigation system, you can use this package.
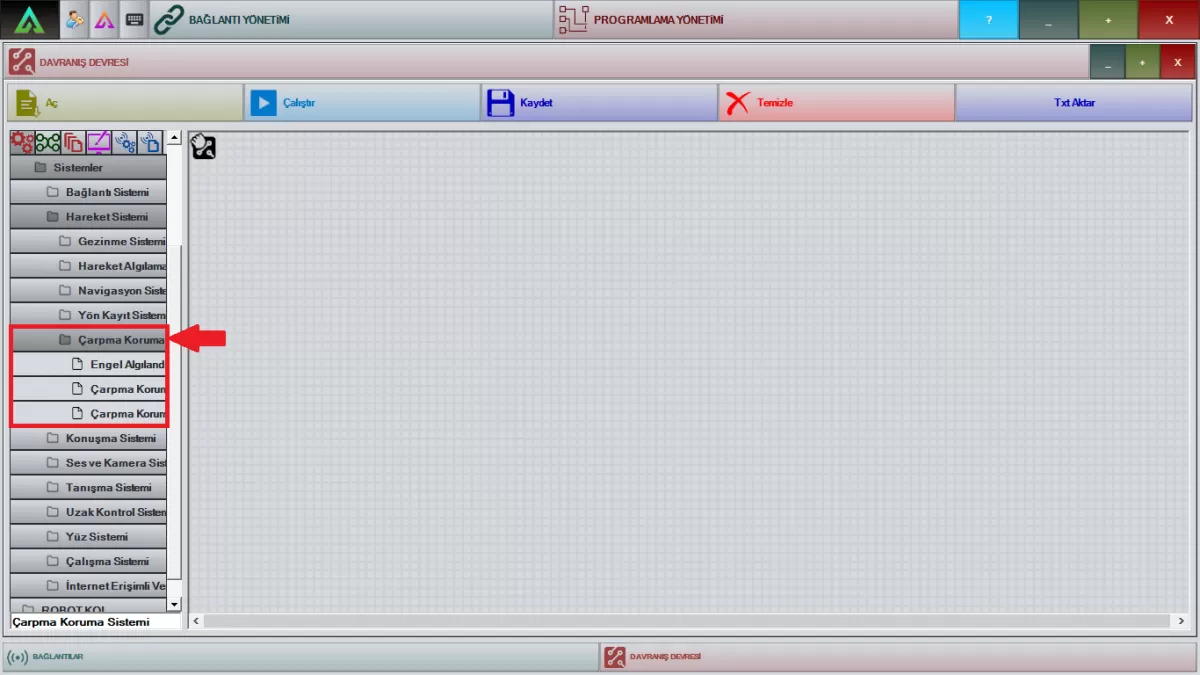 Image 7: Impact Protection System Screen
Obstacle Detected: Drag the relevant package to the workspace. It is the package in which you will set how many centimeters (cm) your robot will detect any obstacle while roaming freely.
Impact Protection Active: Drag the relevant package to the work screen. It is the package in which you can activate whether your robot will encounter obstacles while navigating with the joystick besides free-roaming.
Impact Protection Passive: Drag the relevant package to the working screen. With this package, it is the package that allows the user to be completely controlled against the obstacles that your robot encounters while navigating.
Note: Obstacle Detected, Collision Protection Active, Collision Protection Passive packages are only used in robots with Lidar System.
C- Speech System
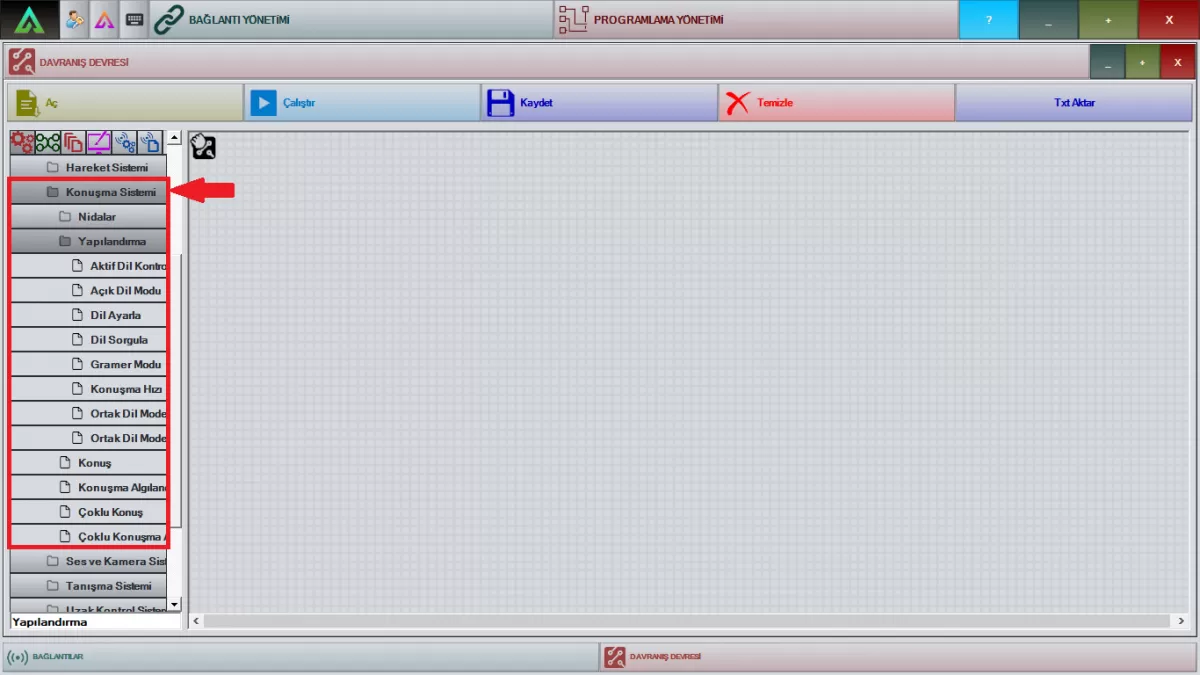 Image 8: Speech System Screen
Cries: Each of the related packages is the package in which the human shouts available in Mini ADA are recorded. You cannot make any changes to these packages, which will work as you have prepared in the choreography.
Active Language Control: It allows you to control the currently spoken language of Mini ADA, which has the relevant package multi-language option, according to the choreography you have determined.
Open Language Mode: After perceiving and interpreting the questions posed to Mini ADA, which has a multi-language option in the relevant package, it provides the relevant answer according to the choreography you have prepared.
Set Language: You can choose which language you want Mini ADA to speak with your choreographies, which has a multi-language option, through this package.
Query Language: Mini ADA, which has a multi-language option in the relevant package, allows the multi-language texts in your choreographies to be inquired in which language and answered according to that language.
Grammar Mode: The related package allows Mini ADA, which has multi-language options, to detect your choreographies in the selected language and respond to the texts prepared in that language.
Speech Rate: It determines the speed of the speech packages you have prepared in your choreographies. With this package, you can slow down or speed up the speed of all your choreographies.
Open Common Language Model: The relevant package activates the system of understanding both languages and responding accordingly by selecting the other language you want Mini ADA to speak along with the Turkish language.
Close Common Language Model: While this package turns off the other language mode that Mini ADA speaks together with the Turkish language, the installation language will continue.
Speak: Drag the relevant package to the work screen and right-click. You can set the texts you want Mini ADA to speak in your choreographies, the speed and language of these texts from this package. Before loading these texts into Mini ADA, you can check how your robot speaks the text by pressing the 'Publish' button.
Speech Detected: The relevant package is the package that allows Mini ADA to make sense of the words it has heard and respond according to these texts.
Multi-Talk: Drag the relevant package to the work screen and right-click. It is the package that you will prepare to give multiple answers to the same texts that Mini ADA makes sense in your choreographies, instead of a single answer.
Multiple Speeches Detected: The relevant package is the package in which you will make Mini ADA make a single speech by making sense of many texts with the choreographies you will prepare.
D- Sound and Camera System
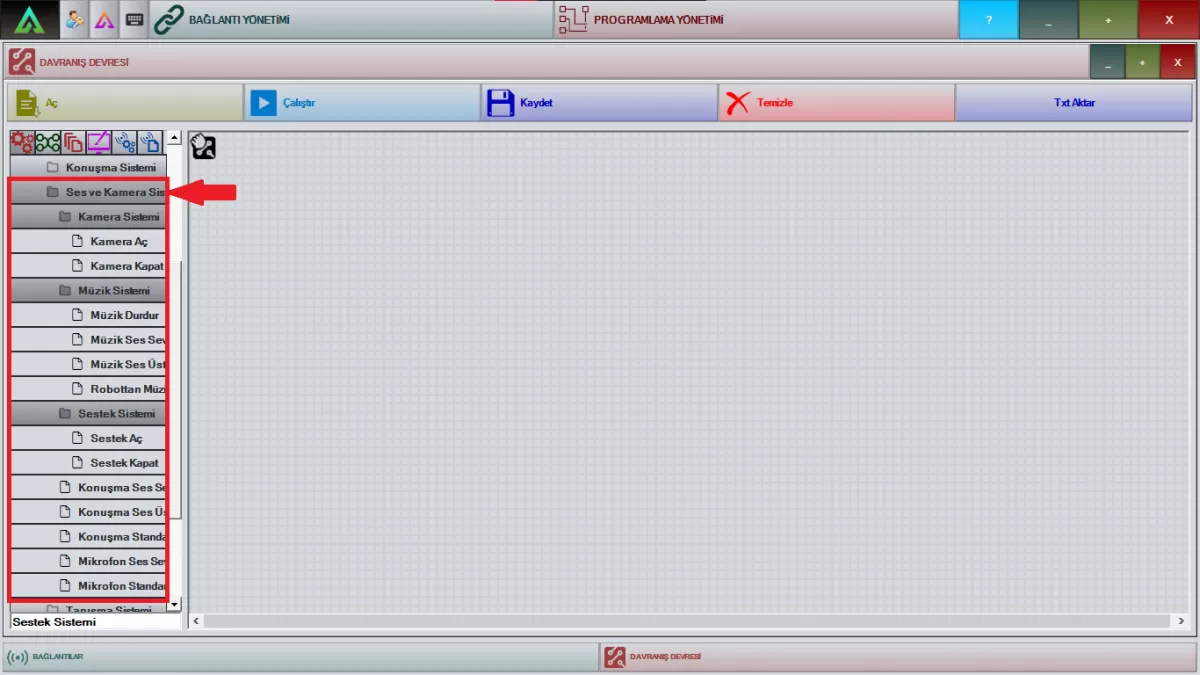 Figure 9: Sound and Camera System Screen
Stop Music: You can stop the music you have loaded into Mini ADA with this package, depending on your choreography.
Note: This package is a ready package, you cannot change it.
Music Volume: Drag the relevant package to the work screen and right-click. It is the package where you can adjust the volume of the sounds you have prepared with the 'Play music' package in your choreographies of Mini ADA. You can make adjustments in your choreographies from the section that says 'Level' in the package.
Music Volume Upper Limit: Drag the relevant package to the working screen and right-click. It is the package where you will set the upper limit of the music volume in your choreographies for Mini ADA. You can make your adjustments from the section that says 'Music Upper Limit' in the package.
Play Music from Robot: Drag the package shown to the working screen and right-click. Write the name of the music you have uploaded into Mini ADA exactly in the part that says "Filename". You can activate it with your choreography.
Open Sestek: Drag the relevant package to the workspace. It is the package that will activate the speech and perception system after your robot completes its choreography on audio-video sites and music playing sites.
Sestek Close: Drag the relevant package to the working screen. It is the package that activates the sound of the videos and music in your designs that you have prepared with the audio-video site and music playing sites on the front screen of your robot.
Note: When this package is activated, your robot's speech system will be turned off.
Speech Volume: Drag the relevant package to the work screen and right-click. This is the area where you can adjust the speaking volume of Mini ADA in your choreographies. You can make your adjustments from the section that says 'Level' in the package.
Speech Volume Upper Limit: Drag the relevant package to the work screen and right-click. It is the package where you will set the upper limit of the speech volume in your choreographies prepared for Mini ADA. You can make your adjustments from the section that says 'Speaker Upper Limit' in the package.
Speech Standard Level: Drag the relevant package to the working screen. If you want the Mini ADA to stay at a standard volume level all the time, you can adjust it with this package.
Microphone Volume: Drag the relevant package to the work screen and right-click. It is a package where you can adjust the volume of the microphone, which is used to hear the people who will interact with the Mini ADA. In this package, you can make your adjustments from the section that says 'Level'.
Microphone Standard Level: Drag the relevant package to the work screen and right-click. It is the package where the standard level of the microphone is ready to hear the people who will interact with the Mini ADA. You can prepare your choreographies using this package.
E-Introduction System
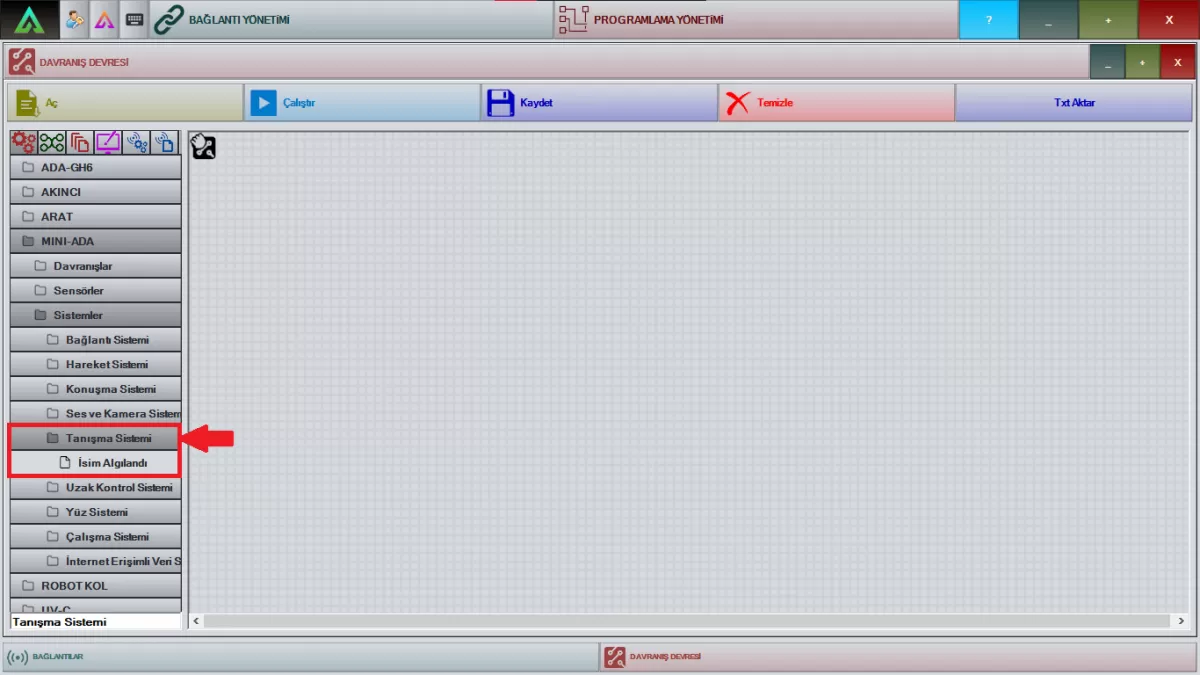 Image 10: Introduction System Screen
Name Detected: Drag the relevant package to the workspace. It is a package that enables Mini ADA to use all the sentences it has heard by assigning them to the selected variable.
Note: You need to put your robot into Open Language Detection Mode before running this package.
F-) Remote Control System
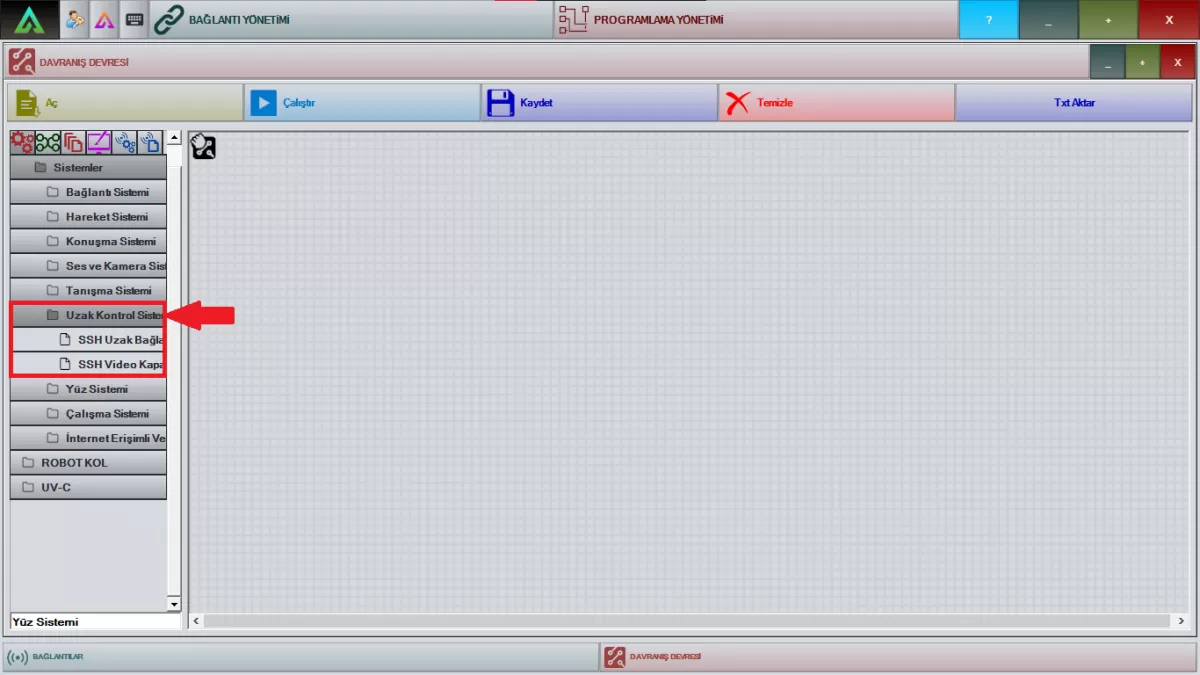 Figure 11: Remote Control System Screen
SSH Remote Connection: Drag the relevant package to the work screen and right-click. It is the package for opening the video playback on the front screen of Mini ADA and a projector. It is obligatory to write a static IP number in the IP part.
SSH Video Shutdown: Drag the relevant package to the workspace and right-click. It is the package to turn off video playback from the front screen of Mini ADA and over a projector. It is obligatory to write a static IP number in the IP part.
G- Face System
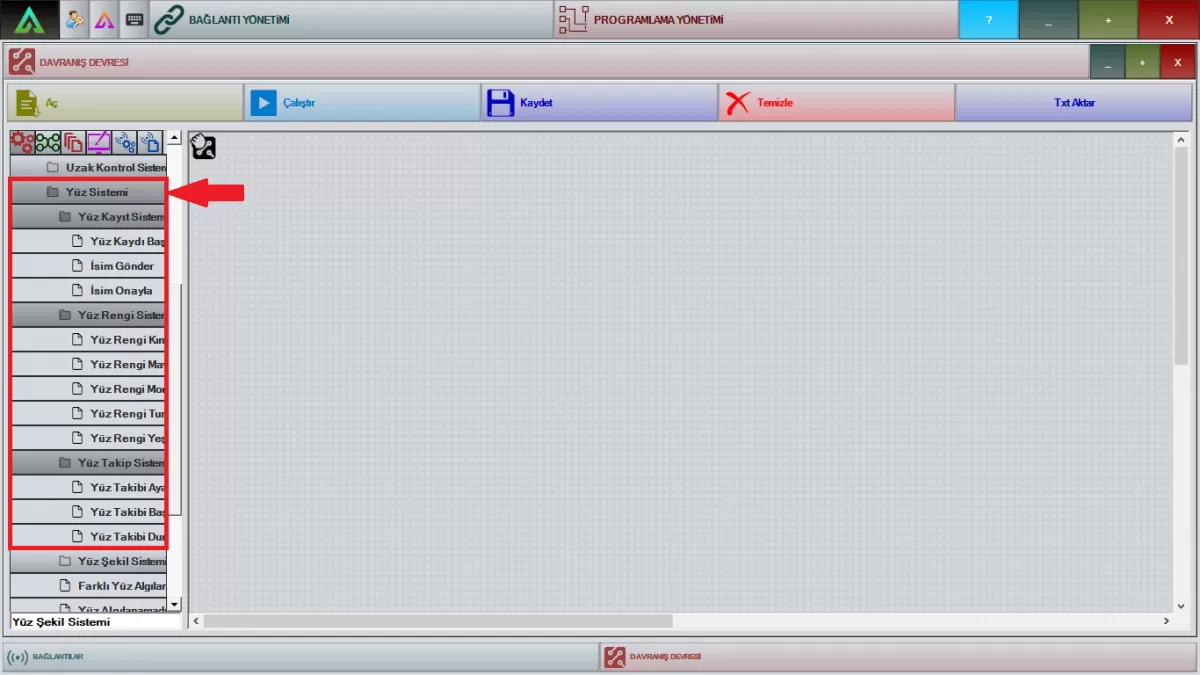 Image 12: Face System Screen
Start Face Registration: Drag the relevant package to the working screen. It is the package that activates the registration of the face of the person the robot sees. When this package is activated, it will record the face of the person it sees with the camera located on the head of the robot.
Submit Name: Drag the relevant package to the workspace. It is the package where you will write the name of the picture you want to save after activating the start face recording package.
Confirm Name: Drag the relevant package to the workspace. It is the package in which the names of the people you want your robot to know are approved.
Note: Start Face Registration, Send Name, Confirm Name packages are interconnected packages. It cannot be used separately.
Face Color System: Drag the relevant package to the working screen. These are ready-made packages where you can edit the face color of Mini ADA as red, blue, green, purple, turquoise.
Set Face Tracking: Drag the relevant package to the work screen and right-click. Before mini ADA's face tracking system is activated, you can adjust the tolerance angles according to your choreographies with this package.
Start Face Tracking: Drag the relevant package to the work screen. It is the package that starts tracking by detecting the face that Mini ADA sees on its camera.
Note: This is a ready-made package and cannot be modified.
Stop Face Tracking: Drag the relevant package to the working screen. It is the package that stops the system that starts tracking by detecting the face that Mini ADA sees on its camera.
Note: This is a ready-made package and cannot be modified.
 Image 13: Face System Screen
Face Shape System: Drag the related packages to the work screen. These are the packages that are ready for the face shapes of Mini ADA. Using these packages, you can define the face shapes of the Mini ADA according to your own choreographies.
Note: You cannot modify these prepackaged packages.
Different Face Detected: Drag the relevant package to the working screen. It allows your choreographies to detect and respond to a different face within 30 seconds. This is a ready package, you cannot modify it.
No Face Detected: Drag the relevant package to the working screen. When your robot cannot detect any face, it allows it to move according to the choreography you have prepared.
Note: This is a ready-made package, you cannot modify it.
Face Detected: Drag the relevant package to the working screen. When it detects any face, it allows your robot to move as you set it in your choreography.
Note: This is a ready-made package, you cannot modify it.
Face Analysis: Drag the relevant package to the work screen and right-click. With the package shown in the window that opens, it allows your robot to analyze any face according to gender, emotion, and age when it detects any face.
Face Recognized: Drag the relevant package to the work screen and right-click. You can make your robot recognize the people it encounters by typing the name of the picture you have saved in this package.
H-Working System
 Image 14: Operating System Screen
Close: Drag the relevant package to the workspace. Apart from the on/off button and the front screen on the back of the Mini ADA, if you want it to turn off with a call or a condition depending on your choreography, you can do it with this package.
Restart: Drag the relevant package to the workspace. If you want to restart your robot with a call or a condition other than the front screen of Mini ADA, depending on your choreography, you can do it with this package.
Open Autonomy: With the relevant package, you can activate the work of the choreographies that you put in your robot.
Autonomy Turn-Off: With the relevant package, you can ensure that the choreographies you put in your robot do not work until the opposite is done.
Turn On Telemetry: It is the package used to receive telemetry (Work) data transmitted from your robot. You can activate it by clicking the 'Publish' button in this package.
Turn Off Telemetry: It is the package used to turn off telemetry (Work) data transmitted from your robot. You can activate it by clicking the 'Publish' button in this package.
I-) Data System with Internet Access
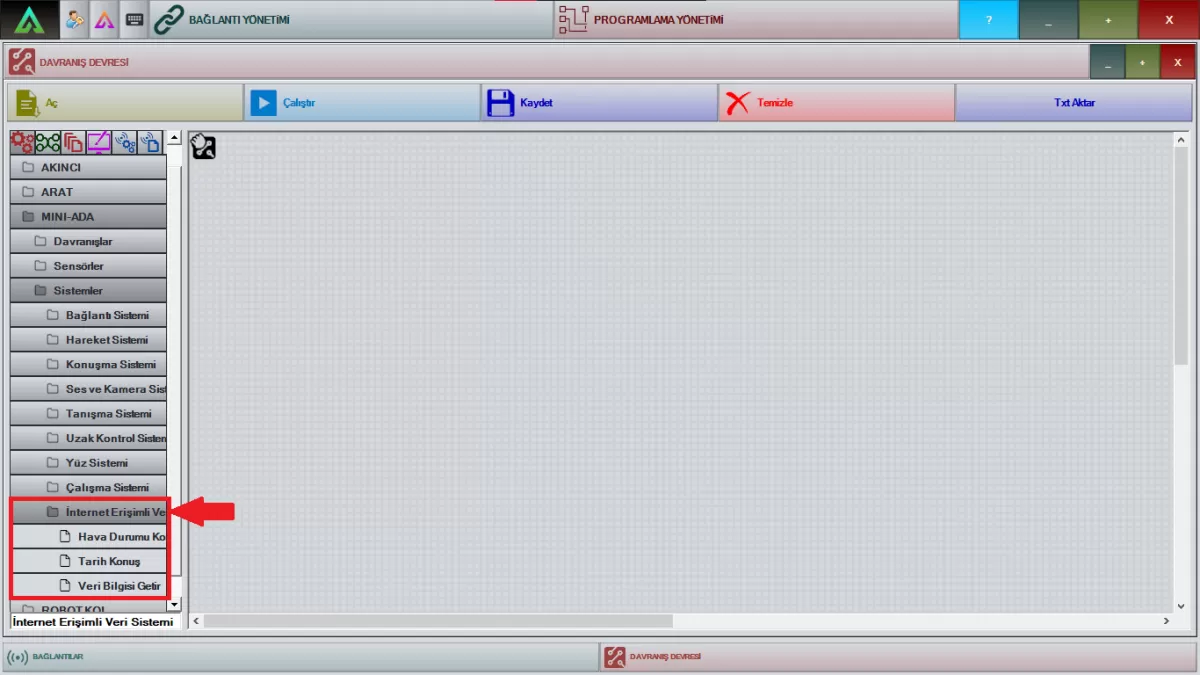 Image 15: Data System Screen with Internet Access
Talk Weather: The relevant package is the package that will instantly give the weather information of the cities, provided that Mini ADA is connected to the internet network.
Note: Mini ADA reports that it cannot provide weather information if it is not connected to any internet network.
Speak History: The relevant package is the package that will give the date information of the countries and cities instantly, provided that Mini ADA is connected to the internet network.
Note: Mini ADA states that it cannot provide date information if it is not connected to any internet network.
Bring Data Information: This is the package that will provide you with choreographies, exchange rate information, and price information about precious metals, provided that Mini ADA is connected to the internet network.
Note: Mini ADA reports that it cannot provide data information if it is not connected to any internet network.
Mini ADA Daily Use (PROGRAMMING)
MINI ADA DAILY USE (PROGRAMMING)
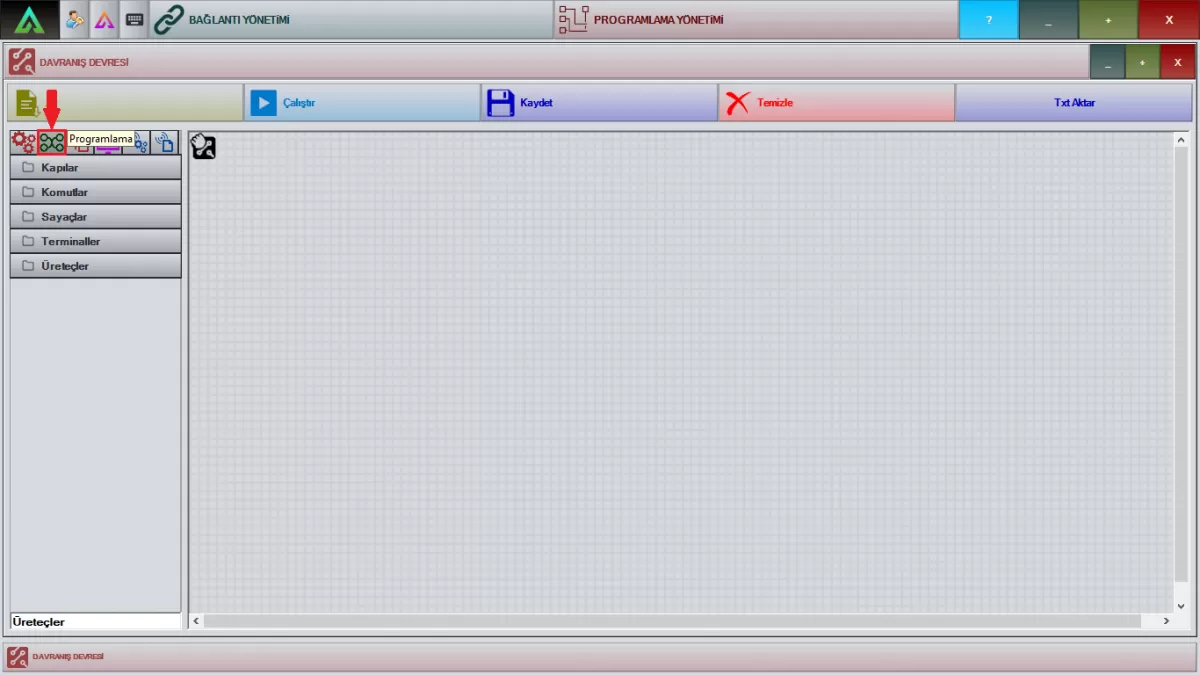
Image 1: Programming Screen
A-Doors
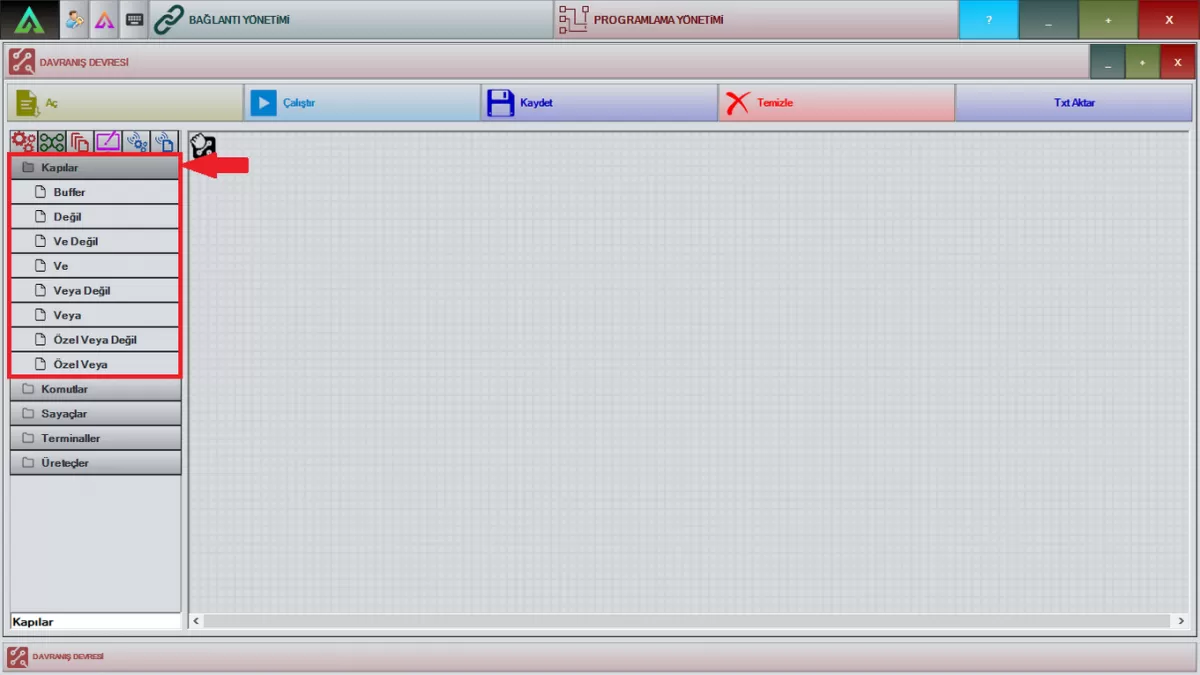
Image 2: Doors Screen
Buffer: Drag the relevant package to the workspace. This package is the package that distributes the power system. You can activate your choreographies by connecting the main power pack.
Not: Drag the relevant package to the workspace. The choreography you will prepare is the package that will be used to make two negative actions. Indicates which action to take at the end of negative actions.
And Not: Drag the relevant package to the workspace. It is the package that will work if the two orders you have given to your robot with the choreography you will prepare are not fulfilled.
And: The related package is the package that combines multiple previous processes. After the processes of the choreography packages are finished, it provides the transition to another process if there is one.
Or Not: Drag the relevant package to the workspace. It is the package that will work if one of the two separate orders you have given to your robot with the choreography you will prepare is not fulfilled.
Or: It is a package that allows running any of the previous processes randomly with the related package.
B-) Commands
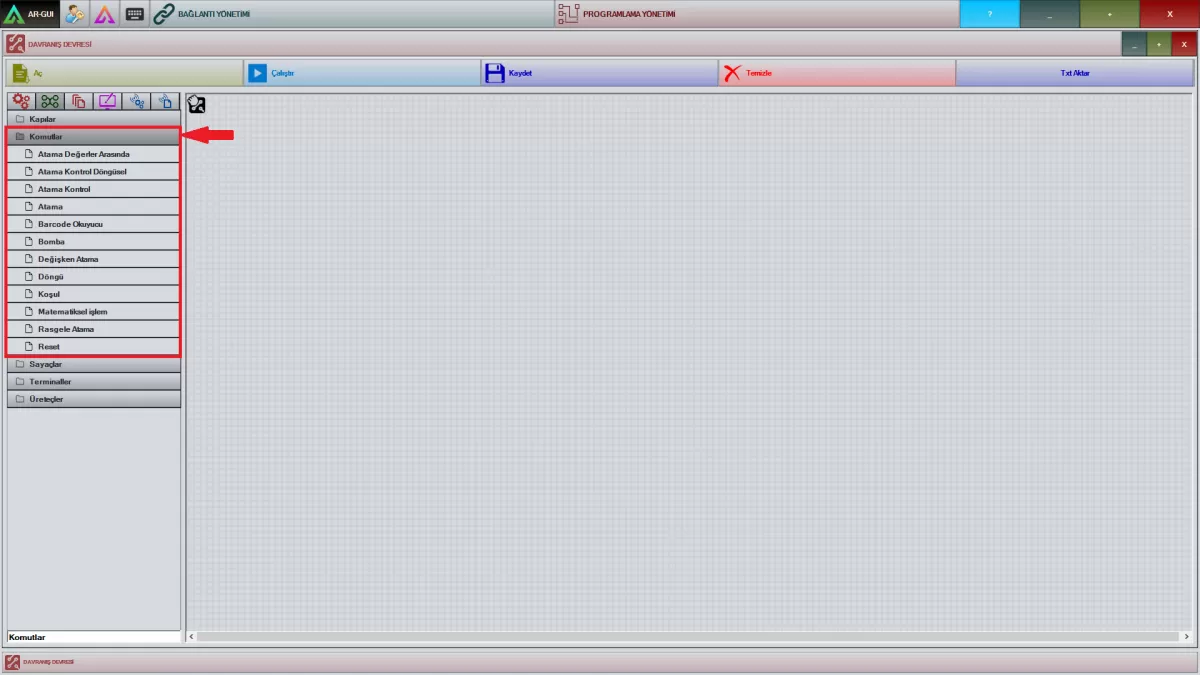
Image 3: Commands Screen
Between Assignment Values: Drag the relevant package to the work screen and right-click. It is the package that determines the lower and upper-value limits in this package and checks whether the variable we choose is between these values.
Assignment Control Cyclic: Drag the relevant package to the work screen and right-click. This package helps you to make the operation assignments of the variable and the value you have written in it. If the value is not as specified, it does not proceed to the next operation.
Assignment Control: Drag the relevant package to the work screen and right-click. This package helps you to make the operation assignments of the variable and the value you have written in it. If the value is as specified, it switches to the next operation.
Assignment: Drag the relevant package to the work screen and right-click. It allows us to assign a new value to this variable by selecting the variable in this package.
Barcode Reader: Drag the relevant package to the working screen. With the pop-up window, the QR code held in front of the barcode reader enables the previously interpreted information to be read and to act according to the information read.
Note: This feature is not available on all Mini ADAs. It is optionally integrated.
Bomb: Drag the relevant package to the working scre.en. It is the package that you will use to put the works you have done in your choreographies into a passive position. Your choreographies will not work after the bomb pack.
Variable Assignment: Drag the relevant package to the workspace. This package is used so that your robot can recognize the variable you have selected with 'Assignment' in your choreographies.
Loop: Drag the relevant package to the workspace. This package is used with 'Reset'. By defining your choreography between 'Loop' and 'Reset', you can specify the number of moves you want it to perform.
Condition: Drag the relevant package to the workspace. It is the package that will be used to control the value of the variable according to the desired situation by assigning a condition to the value you have selected with 'Assignment' in your choreographies.
Mathematical Operation: Drag the relevant package to the workspace. It is a package that creates a new value by performing mathematical operations on the variable you have selected with 'Assignment' with another variable in this package.
Random Assignment: Drag the relevant package to the workspace. The variable you select with 'Assignment' assigns a random value between the minimum and maximum values you have set in this package.
Reset: Drag the relevant package to the working screen. This package is used in conjunction with the 'Loop'. By defining your choreography between 'Loop' and 'Reset', you can specify the number of movements you want it to perform.
Rounding: Drag the relevant package to the workspace. It is the package in which you will arrange the values from information packages such as Weather, Currency Information, Precious Metals, and how many digits after the comma will be displayed.
C-) Counters
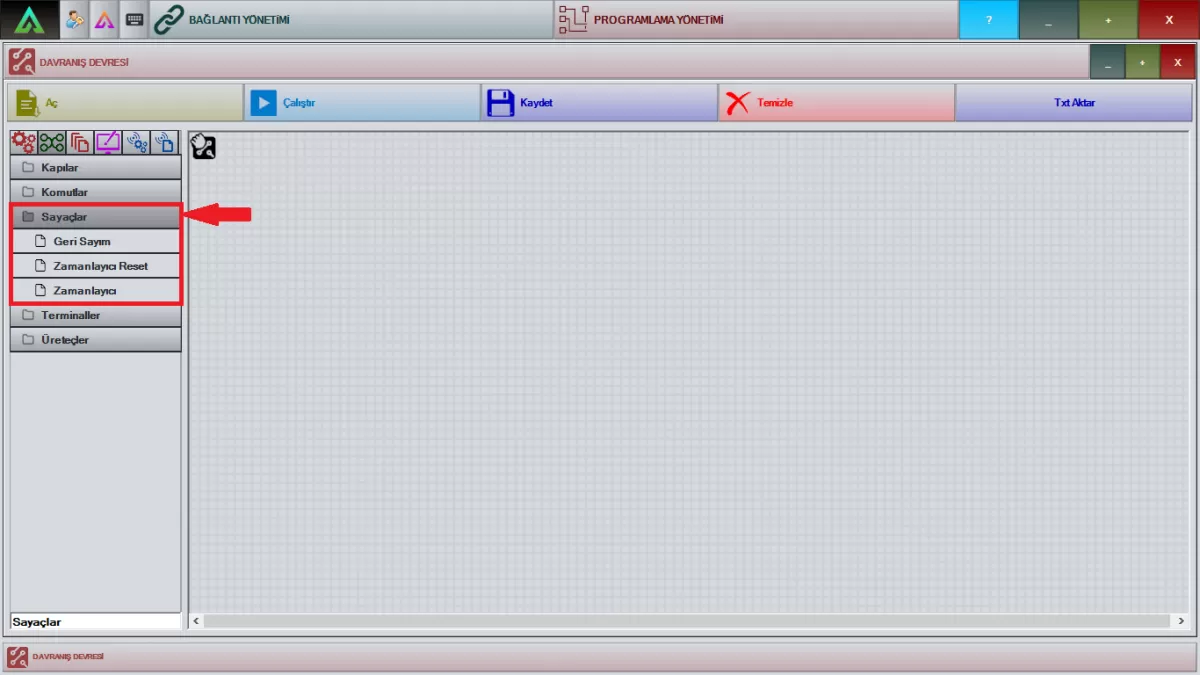
Image 4: Counters Screen
Countdown Screen: Drag the relevant package to the work screen and right-click. You can set how many times your choreographies will be repeated from the 'Beginning' section in the package.
Timer Reset Screen: Drag the relevant package to the work screen and right-click. It is a package that works together with the 'timer' package. Used to reset the timing pack. The name to be given to the section in the package that says 'Timer Name' must be the same in both.
Timer Screen: Drag the relevant package to the work screen and right-click. This package is a package that determines the time before proceeding to the next operation. It is sufficient to specify the waiting time in the section that says 'Duration'.
D-) Terminals
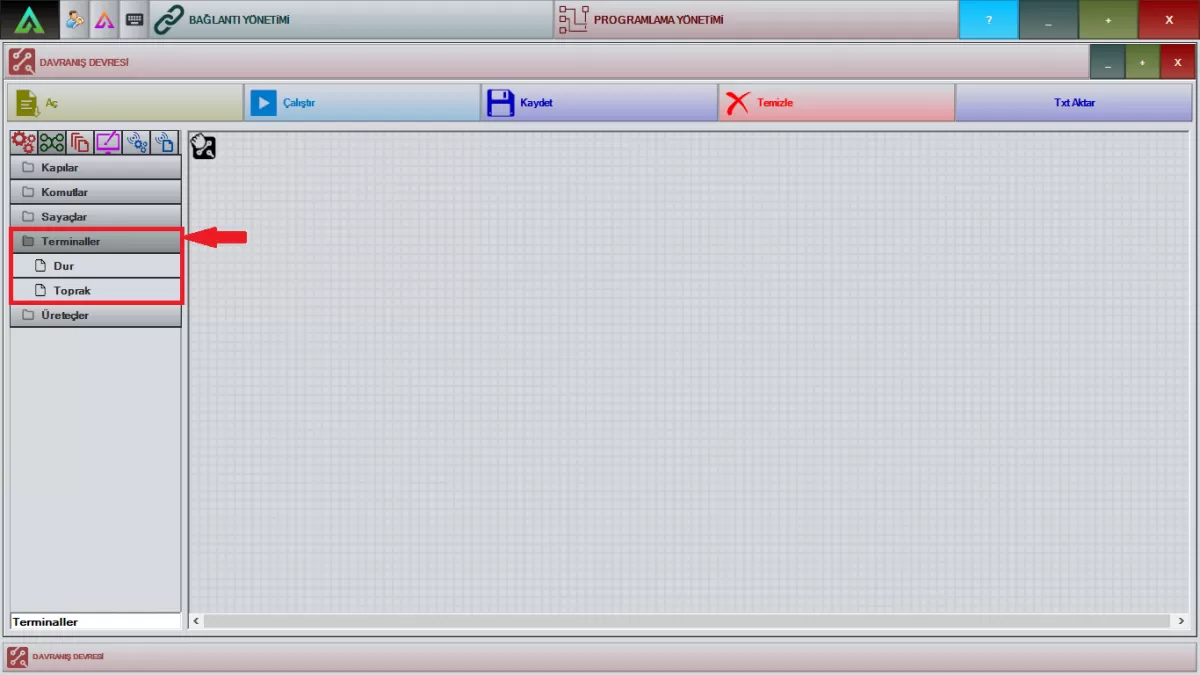
Image 5: Terminals Screen
Stop: With the relevant package, your choreographies also ensure that the part that comes up to this package will work and stop. Operations you have done after this package will not work.
Soil: When you add this package to the end of the operations you will perform in your choreographies with the relevant package, it will run the part of the choreography only once.
E-) Generators
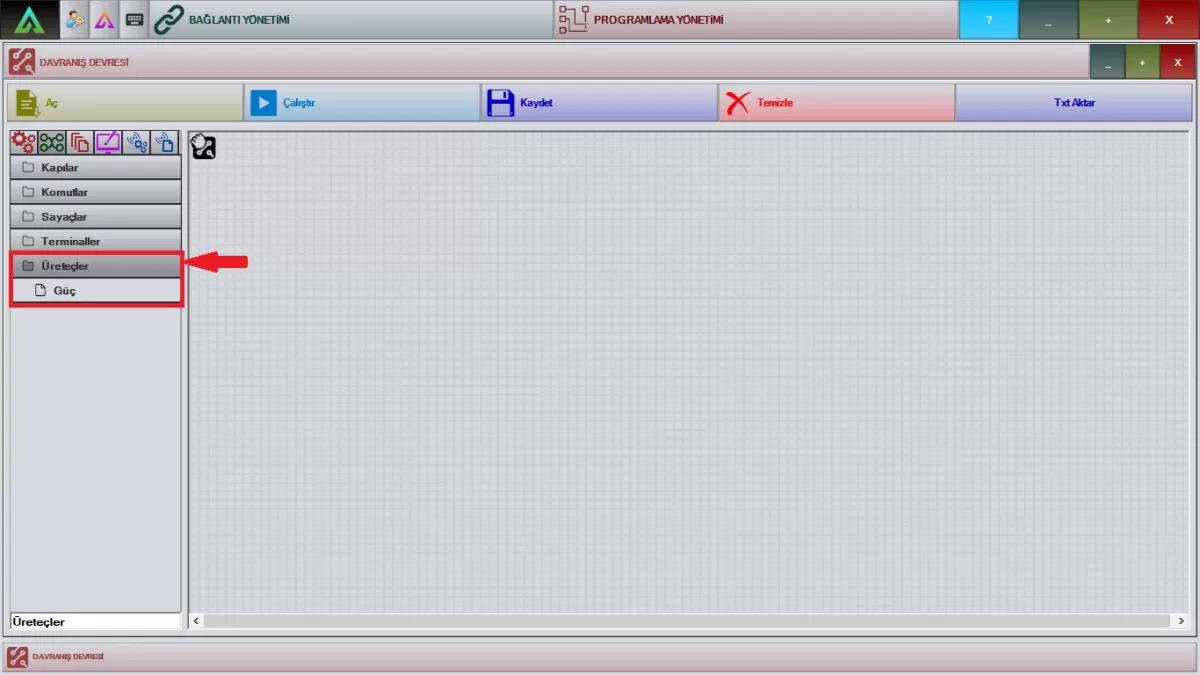
Image 6: Generators Screen
Power: The relevant package is the package that runs the systems you should use at the beginning of all your choreographies. If you don't use the 'Power' pack when all your choreography is ready, it won't work.
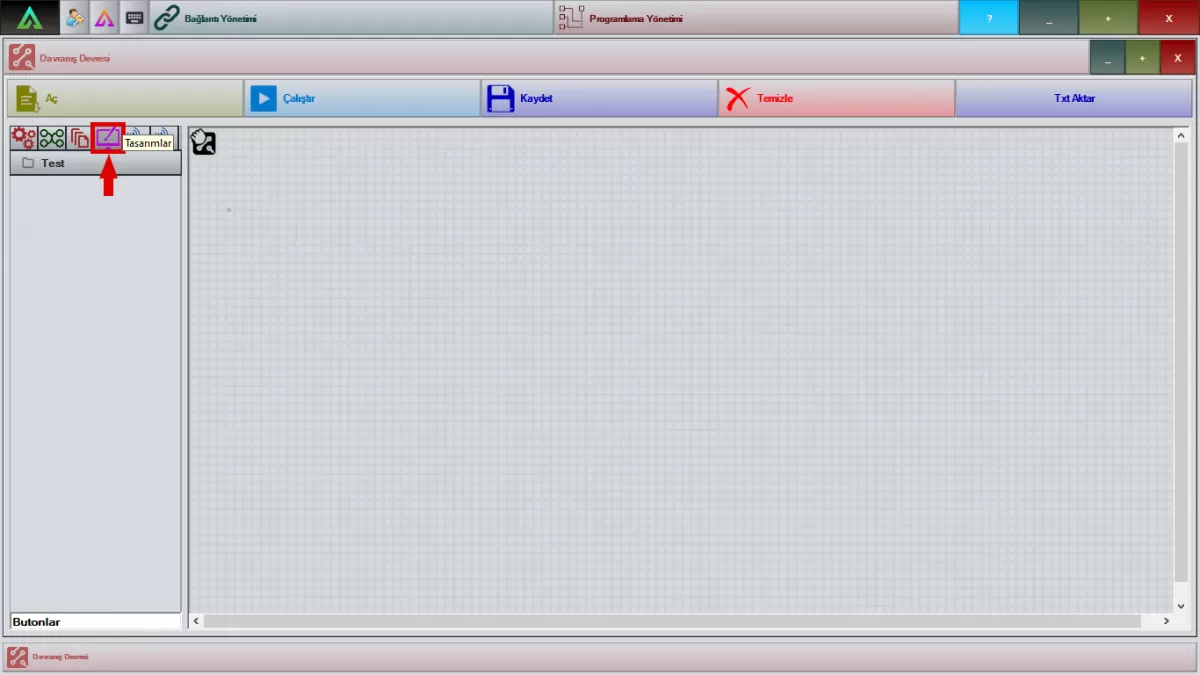
Image 7: Designs Screen
The marked part in Image 7 is the part where you will see the 'Input' and 'Output' of the work you have done in AR-Designer. Make the connections of the work on the front screen of Mini ADA by taking the packages in this section.
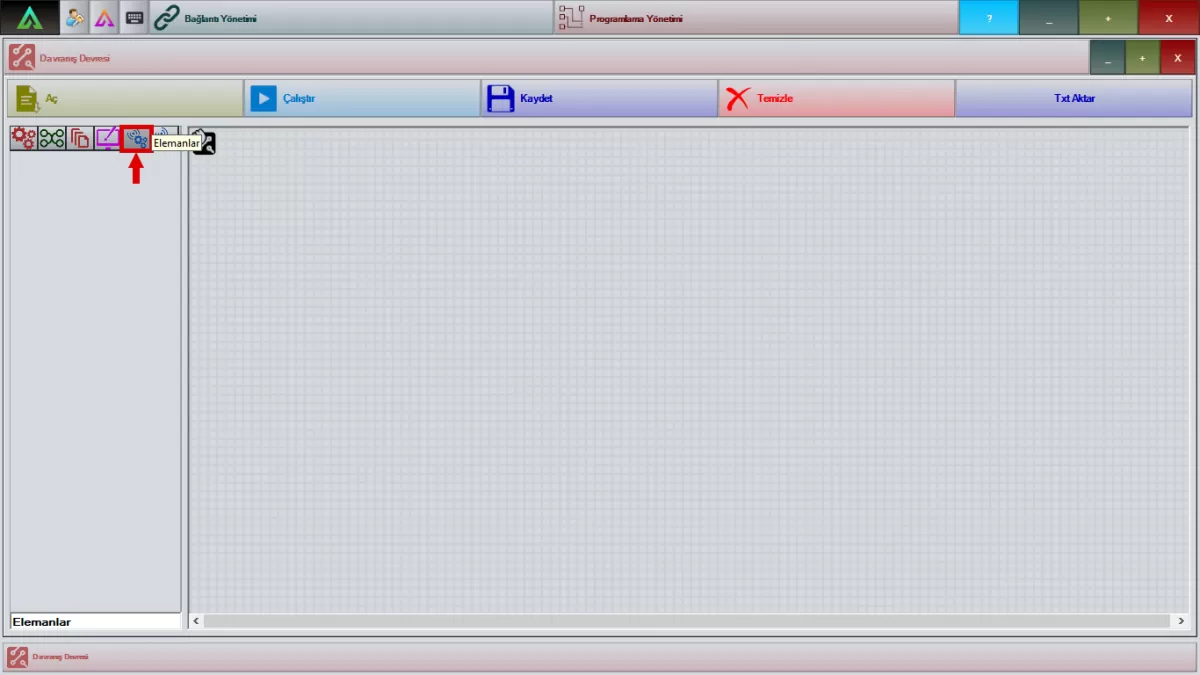
Image 8: Elements Screen
This is the area where you will see the Behavior, Sensors, and Systems Elements from the marked section in Image 8.
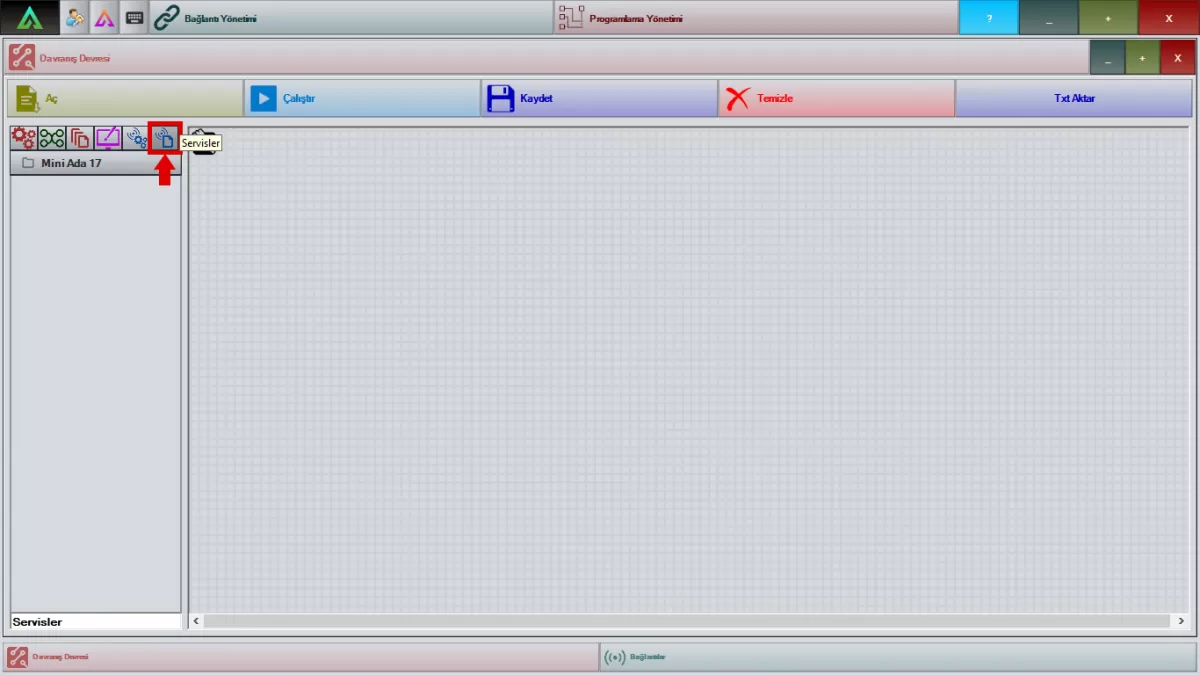
Image 9: Services Screen
The marked part in Figure 9 is the area where you will see the choreographies you have loaded into your robot.